OpenWeatherMap API를 사용하여 날씨데이터 받아오기
2016-08-29 10:31:08

OrangeBoard WiFi는 기존 OrangeBoard에 WiFi모듈을 장착하여 하나의 보드안에서 아두이노의 기능과 WiFi를 사용할 수 있게 하였습니다.
아두이노에 수많은 데이터를 웹에서 가져올 수 있는 WiFi모듈을 결합하였기 때문에 사용자들은 기존의 아두이노보다 한 단계 더 넓은 범위를 바라보고 사용할 수 있습니다.
개요
이번 글에서는 API를 사용하여 WiFi쉴드로 날씨정보를 가져오는 예제를 실행해 봅시다.
API란 Application Programming Interface의 약자로 프로그램이나 어플리케이션이 정보처리를 위해 운영체제에 호출하는 함수나 서브루틴의 집합을 말합니다.
WebServer는 API를 통해 사용하기 쉬운 인터페이스를 Client에게 제공하고 Client는 API를 가져와서 사용함으로써 손쉽게 원하는 정보에 접근할 수 있습니다.

여러 웹사이트들은 이런 API를 제공하고 있으며 API종류는 수백 수천가지로 다양하게 존재합니다.
만약에 예를 들어 어떤 특정한 지역의 교통정보를 알고 싶다면 교통 정보API를 가져와서 정보를 입력만 한다면 교통정보를 받아올 수 있습니다.

이번에 실행할 OpenWaetherMap또한 날씨정보 API를 제공하는 사이트로써, API를 가져온다면 아두이노에서도 WiFi로 날씨정보를 받아올 수 있습니다.
예제를 실행해보고 날씨정보를 받아오는 작업을 해보겠습니다.

OpenWeatherMap에서 API key받아오기
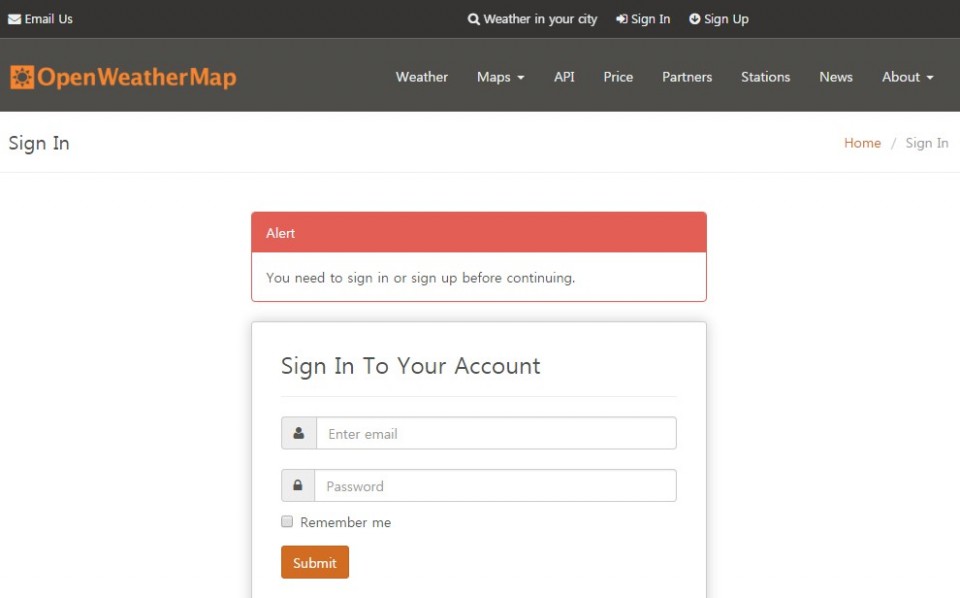
먼저 http://openweathermap.org/에 접속하여 아이디가 없을 경우 회원가입을 하여 로그인을 합니다.
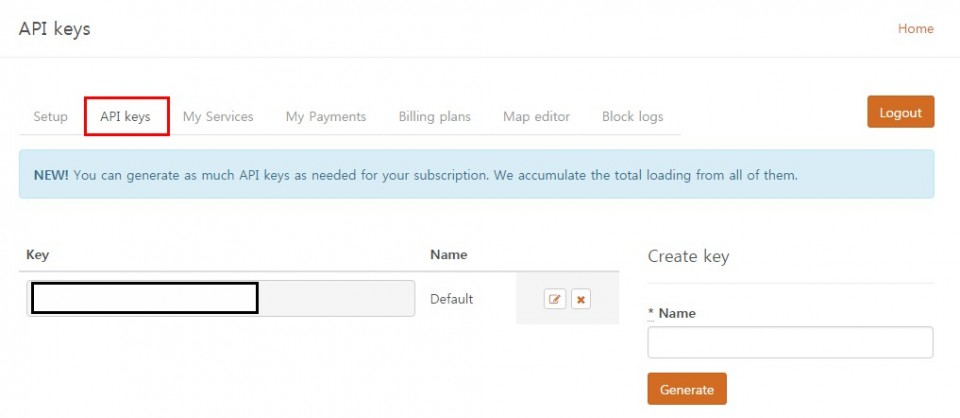
API keys탭에 들어가면 자신만이 사용가능한 고유한 API key값을 확인할 수 있습니다.
API key값은 API에서 정보를 가져오기 위한 필수 정보이니 따로 복사를 합니다.
아두이노 코드 업로드 하기
다시 아두이노로 돌아와서 아래 코드를 복사 후 OrangeBoard WiFi에 업로드 시킵니다.
#include <SPI.h>
#include <WizFi250.h>

int getInt(String input);

#define VARID      "APIKEY"

char ssid[] = "SSID";       // your network SSID (name)
char pass[] = "PASS";        // your network password
int status = WL_IDLE_STATUS;       // the Wifi radio's status

char server[] = "api.openweathermap.org";

unsigned long lastConnectionTime = 0;         // last time you connected to the server, in milliseconds
const unsigned long postingInterval = 1000L; // delay between updates, in milliseconds

boolean readingVal;
boolean getIsConnected = false;
//String valString;
int val, temp;
float tempVal;

String rcvbuf;

// Initialize the Ethernet client object
WiFiClient client;

void httpRequest();
void printWifiStatus();

void setup()
{
  // initialize serial for debugging
  Serial.begin(115200);
  Serial.println(F("\r\nSerial Init"));

  WiFi.init();

  // check for the presence of the shield
  if (WiFi.status() == WL_NO_SHIELD) {
    Serial.println("WiFi shield not present");
    // don't continue
    while (true);
  }

  // attempt to connect to WiFi network
  while ( status != WL_CONNECTED) {
    Serial.print("Attempting to connect to WPA SSID: ");
    Serial.println(ssid);
    // Connect to WPA/WPA2 network
    status = WiFi.begin(ssid, pass);
  }

  Serial.println("You're connected to the network");

  printWifiStatus();
}

void loop() {
  // if there's incoming data from the net connection send it out the serial port
  // this is for debugging purposes only
  String valString;
  while (client.available()) {

    if ( rcvbuf.endsWith("\"temp\":")) {
      readingVal = true;
      valString = "";
    }

    char c = client.read();

    if ( c != NULL ) {
      if (rcvbuf.length() > 30)
        rcvbuf = "";
      rcvbuf += c;
      //Serial.write(c);
    }

    if (readingVal) {
      if (c != ',' ) {
        valString += c;
        //Serial.write(c);
      }
      else {
        readingVal = false;
        //Serial.println(valString);
        tempVal = valString.toFloat() - 273.0;
        Serial.println(tempVal);
      }
    }
  }
  if (millis() - lastConnectionTime > postingInterval) {

    if (getIsConnected) {
      Serial.println(valString);
      Serial.println(F("==================="));
      Serial.print(F("Temperature : "));
      Serial.println(tempVal);
      Serial.println(F("==================="));
    }
    httpRequest();
  }
  rcvbuf = "";
}

// this method makes a HTTP connection to the server
void httpRequest() {
  Serial.println();

  // close any connection before send a new request
  // this will free the socket on the WiFi shield
  client.stop();

  // if there's a successful connection
  if (client.connect(server, 80)) {
    Serial.println("Connecting...");

    // send the HTTP PUT request
    client.print("GET /data/2.5/weather?q=Seoul,kr&appid=");
    client.print(VARID);
    client.println(" HTTP/1.1");
    client.println("Host: api.openweathermap.org");
    client.println("Connection: close");
    client.println();

    // note the time that the connection was made
    lastConnectionTime = millis();
    getIsConnected = true;
  }
  else {
    // if you couldn't make a connection
    Serial.println("Connection failed");
    getIsConnected = false;
  }
}


void printWifiStatus() {
  // print the SSID of the network you're attached to
  Serial.print("SSID: ");
  Serial.println(WiFi.SSID());

  // print your WiFi shield's IP address
  IPAddress ip = WiFi.localIP();
  Serial.print("IP Address: ");
  Serial.println(ip);

  // print the received signal strength
  long rssi = WiFi.RSSI();
  Serial.print("Signal strength (RSSI):");
  Serial.print(rssi);
  Serial.println(" dBm");
}

int getInt(String input) {
  char carray[20];
  //Serial.println(input);
  input.toCharArray(carray, sizeof(carray));
  //Serial.println(carray);
  temp = atoi(carray);
  return temp;
}
※ 업로드 시킬 때 API key 부분에는 사이트에서 받아온 APIKEY를 입력하고, SSID와 PASSWORD에는 각각 WiFi이름과 비밀번호를 입력합니다.
#define VARID      "API key"

char ssid[] = "SSID";       // your network SSID (name)
char pass[] = "PASS";        // your network password
결과 화면
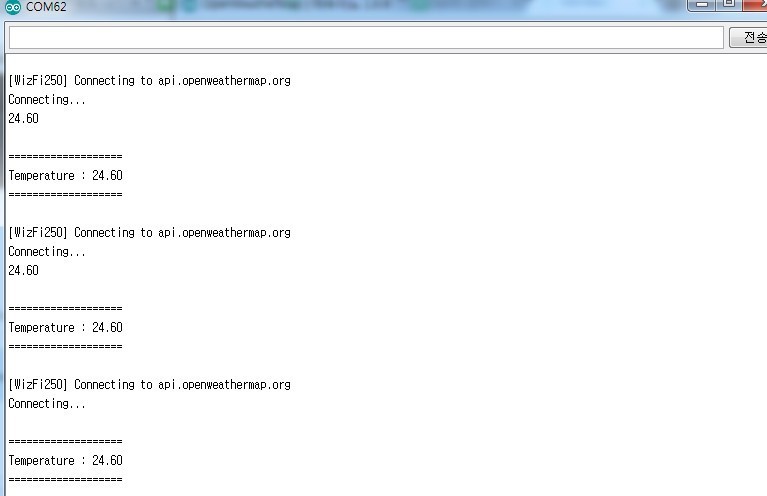
결과화면은 아래와 같이 주기적으로 서울의 현재 온도값이 출력됩니다.
지역을 변경하고 싶다면?!
만약 지역을 변경하고 싶다면 코드상에서 아래 부분을 수정해 주세요.
코드에서는 기본적으로 Seoul로 되어 있지만 지역을 변경할 경우 다른 지역의 온도값을 출력해 볼 수 있습니다.

날씨에 관한 다른 정보를 추출하고 싶다면?!
현재는 코드상에서 온도값만은 가져와서 출력해주고 있습니다.
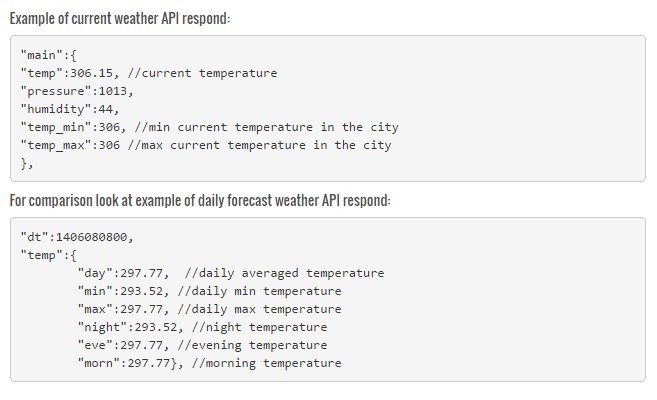
다른 정보를 출력하기 위해서 API에서 전달해주는 데이터를 먼저 분석해 볼 필요가 있습니다.
아래 사진과 같이 데이터를 요청하면 XML형식으로 전달해주며 우리는 코드상에서 파싱을 통해 원하는 정보만 추출하게 됩니다.
온도의 경우 "temp"라는 글 뒤에 절대온도로 306.15와 같이 보여집니다.
아래 코드가 API에서 요청받은 XML데이터에서 온도값을 추출하는 코드입니다.
데이터를 차근차근 읽어오면서 "temp": 라는 값이 오면 그 뒤에 값을 읽어서 온도로 저장하는 형식입니다.
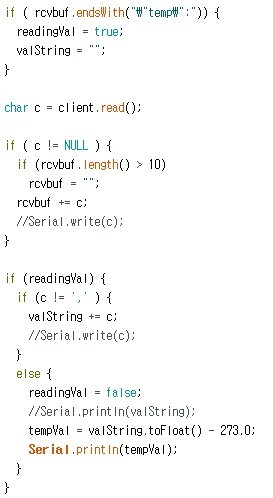
만약 다른 데이터를 가지고 오고 싶다면 temp대신에 pressure나 humidity를 넣어 파싱을 한다면 다른 데이터를 읽어올 수 있겠죠?
물론 온도의 경우 절대온도로 받아왔기 때문에 -273을 해주었지만, 다른 데이터는 그 데이터 타입에 맞게 값을 조절해주어야 합니다.

kocoafabeditor 
항상 진취적이고, 새로운 것을 추구하는 코코아팹 에디터입니다!
 Arduino, OrangeBoard, WiFi, 와이파이, IoT


