
OrangeBoard WiFi와 Ubidots를 연동하여 사용하기 (2)
2016-09-09 16:06:54

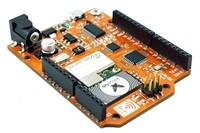
OrangeBoard WiFi는 기존 OrangeBoard에 WiFi모듈을 장착하여 하나의 보드안에서 아두이노의 기능과 WiFi를 사용할 수 있게 하였습니다.
아두이노에 수많은 데이터를 웹에서 가져올 수 있는 WiFi모듈을 결합하였기 때문에 사용자들은 기존의 아두이노보다 한 단계 더 넓은 범위를 바라보고 사용할 수 있습니다.
개요
Ubidots는 IoT 클라우드 솔루션 서비스를 제공하는 업체 중 하나로써 다양한 IoT기기와 연동하여 데이터를 축척 및 분석하고 제어할 수 있는 기능을 제공합니다.
IoT 클라우드 서비스를 통해 유저들은 스마트홈서비스를 구현해 볼 수 있으며, 최근에는 아마존 마이크로소프트와 같은 대기업도 IoT클라우드 서비스를 제공하면서 다양한 IoT기기들과 연동해 볼 수 있을 뿐만 아니라 빅데이터의 축적, 데이터 분석을 통한 인공지능 학습까지 가능하게 되었습니다.

내가 알고싶은 데이터나 별도로 관리하고 싶은 데이터가 있을 때 보통은 개인이 사비로 서버를 구매해서 그 서버를 통해 데이터를 관리하게 됩니다.
하지만 IoT 클라우드 서비스는 그렇게 개인이 서버를 구매할 필요 없이 클라우드 서비스를 제공함으로써 각 사용자들이 손쉽게 여러가지 IoT서비스를 사용하고 정보를 한 눈에 볼 수 있도록 도와줍니다.

Ubidots는 대표적인 IoT 웹 클라우드 서비스 업체 중 하나로, 데이터에 맞게 차트를 그리거나, 컨트롤러 제공, 테이블 제작 등 다양한 기능을 제공하고 있습니다.
근데 아두이노에 WiFi를 장착하면 이런 클라우드 서비스를 쉽게 사용할 수 있습니다. 그렇기에 OrangeBoard WiFi로도 쉽게 사용할 수 있습니다!
이번글에서는 저번글과 반대로 아두이노에서 센서값을 전송하여 Ubidots에서 센서값을 그래프로 나타내는 방법에 대해 알아보겠습니다.
(Ubidots로 아두이노 LED제어하기 : http://kocoafab.cc/tutorial/view/656)
필요한 부품 목록
| No | 부품명 | 수량 | 상세 설명 |
| 1 | OrangeBoard WiFi | 1 | WizFi250을 사용한 WiFi보드 |
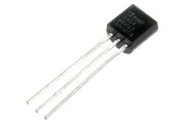
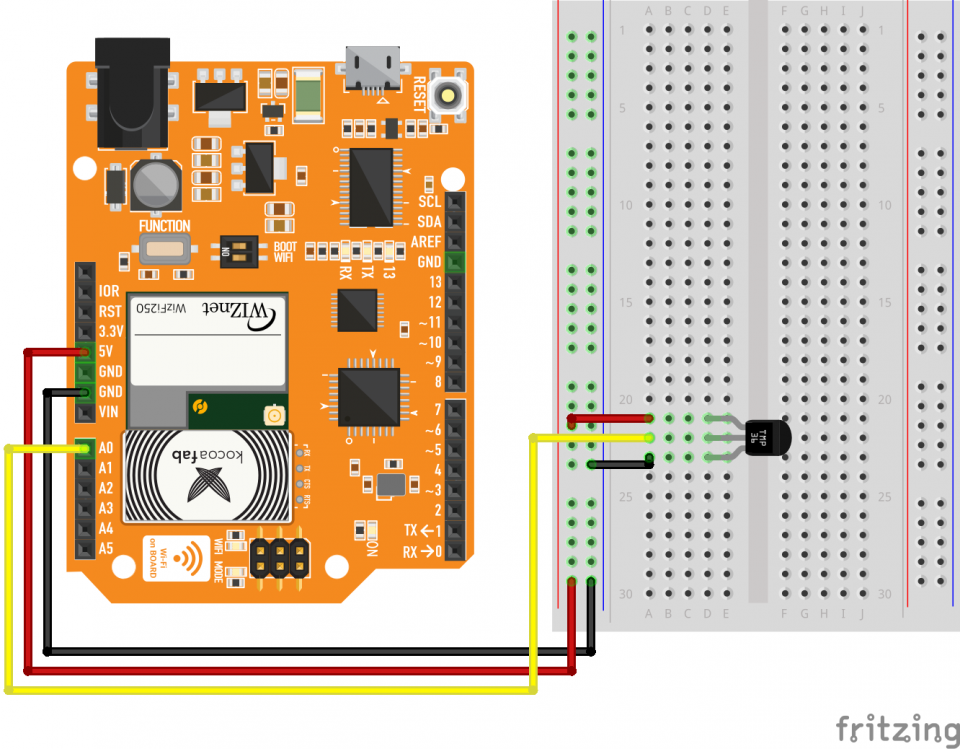
| 2 | 온도 센서 | 1 | TMP36 |
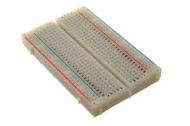
| 3 | 브레드 보드 | 1 | |
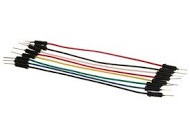
| 4 | 점퍼 케이블 | 4 |
| OrangeBoard WiFi | 온도 센서 | 브레드 보드 | 점퍼 케이블 |
 |
 |
 |
 |
하드웨어 making
※ 아래의 핀은 WiFi모듈과 오렌지 보드 간 통신(SPI통신)을 위해 사용되는 핀이니 사용이 불가한 점을 유의해야 합니다.
혹시 아래 핀에 연결된 선이 있다면 사용이 중복되기 때문에 다른 핀에 연결해야 합니다.
| Pin Number | WizFi250 |
| D4 | WIFI_SS |
| D2 | WIFI_RESET |
| D3 | WIFI_DATA_READY(GPIO14) |
| D11 | WIFI_MOSI |
| D13 | WIFI_SCK |
| D12 | WIFI_MISO |
브레드 보드
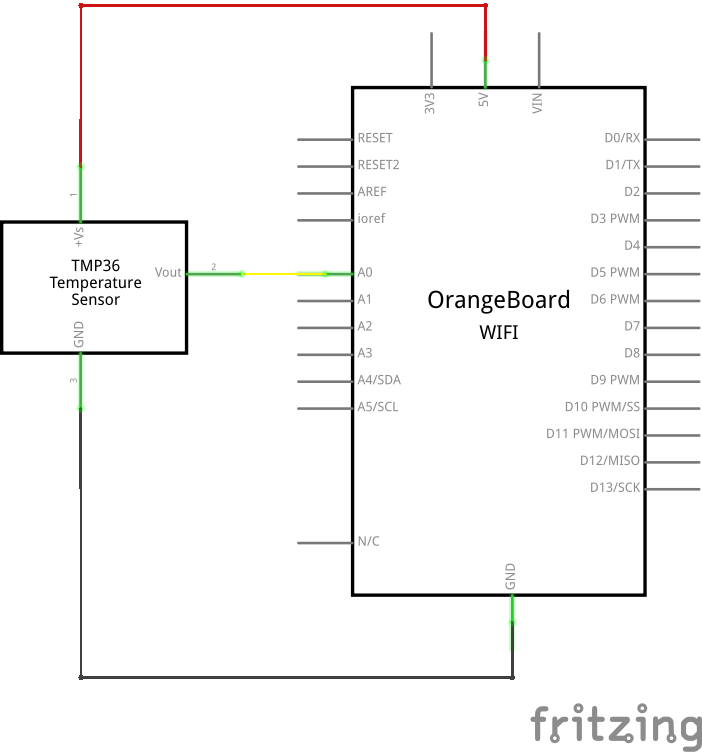
전자 회로도
Ubidots이용하기
이번 글에서는 Ubidots에서 아두이노에서 전송받은 센서값을 그래프로 나타내는 방법에 대해 알아보겠습니다.
만약 기본 회원가입부터 따라해야 한다면 이전글을 참조해주세요. (http://kocoafab.cc/tutorial/view/656)
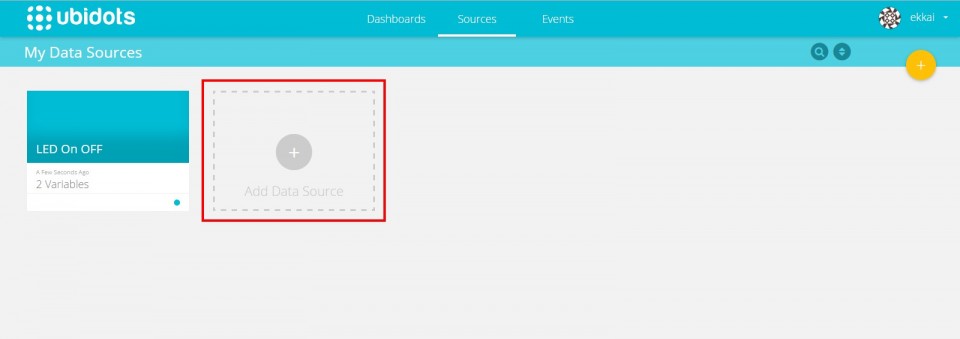
먼저 센서값을 전송받기 위해 상단에 Sources탭을 클릭하고 Add Data Source를 클릭하여 Source를 추가합니다.
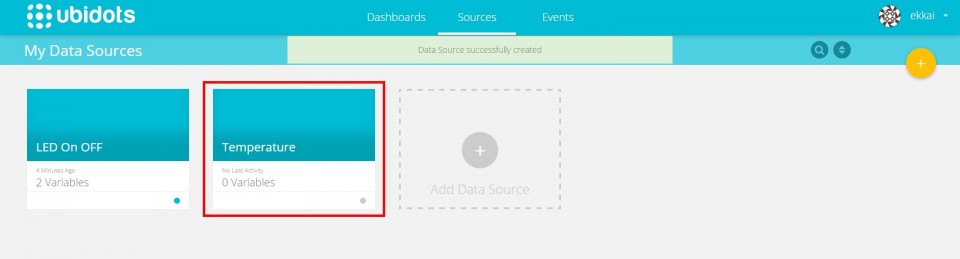
Data Source를 생성 후에 이름을 Temperature로 변경하였습니다.
이제 클릭하여 내부로 들어갑니다.
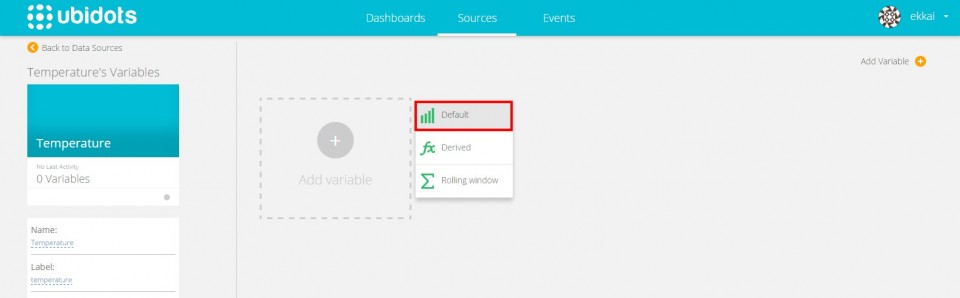
Add variable을 클릭하고 Default를 선택합니다.
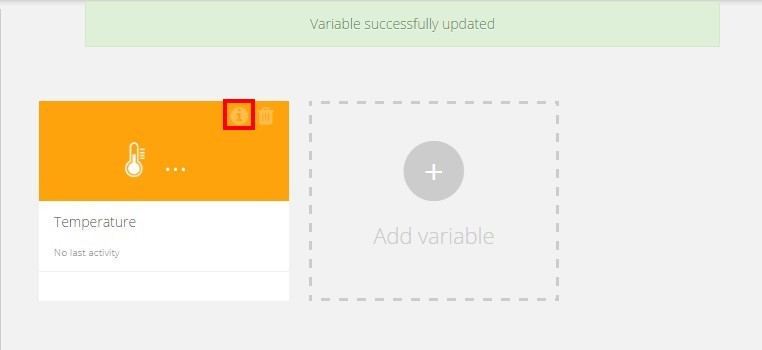
정상적으로 생성이 되었다면 아래와 같이 되는데 이름을 임의로 변경해주시고 오른쪽 위에 있는 i가 써있는 아이콘을 클릭하여 VARID를 확인합니다.
(아래와 같이 Variable의 아이콘을 온도계로 변경하고 싶다면 아이콘을 더블클릭하면 선택할 수 있습니다.)
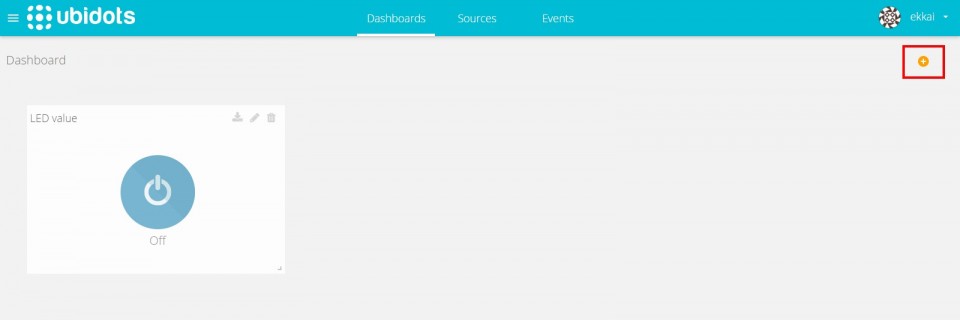
Dashboard탭으로 넘어가서 오른쪽 상단의 +버튼을 눌러 대시보드를 추가합니다.
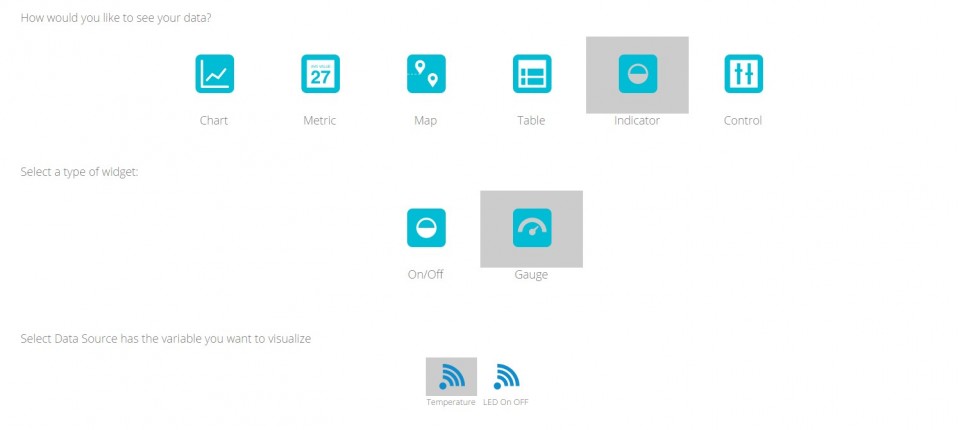
아래와 같은 방법으로 클릭하여 Gauge를 생성합니다.
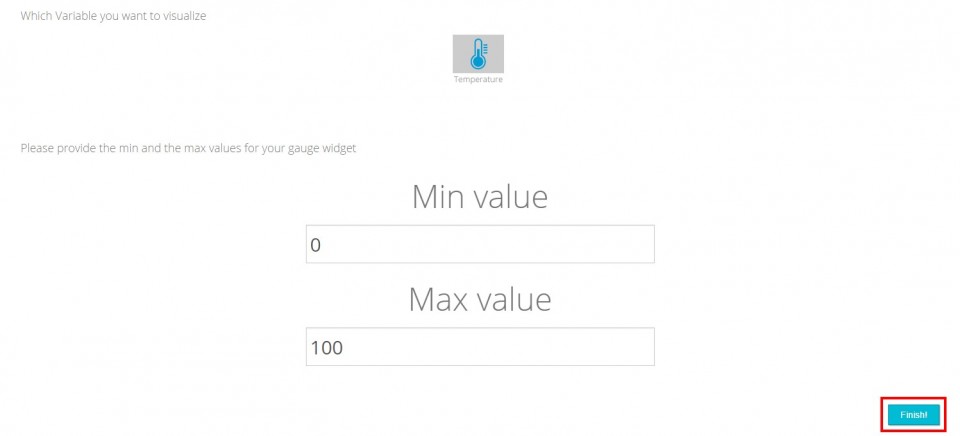
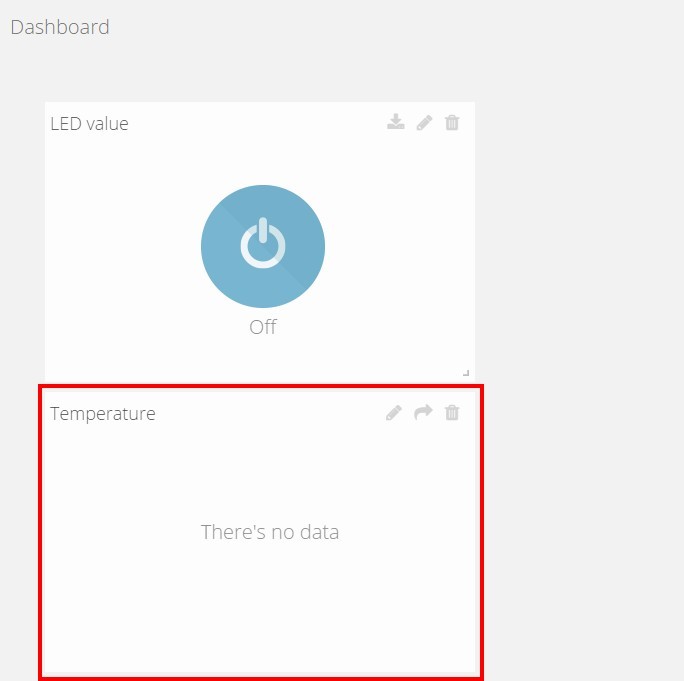
아래와 같이 생성되었으면 이제 센서값을 받아올 준비가 끝났습니다.
소프트웨어 Coding
#include <SPI.h>
#include "WizFi250.h"

//Ubidots information
#define TOKEN      "TOKEN"
#define VARID_TEMP      "VARID"

//Parse JSON
#define PARSE       "\"value\""
#define ENDPARSE    ","

char ssid[] = "SSID";       // your network SSID (name)
char pass[] = "PASS";        // your network password
int status = WL_IDLE_STATUS;       // the Wifi radio's status

//Hardware Pin status
#define Pin_TEMP      A0

char server[] = "thing.ubidots.com";

unsigned long lastConnectionTime = 0;         // last time you connected to the server, in milliseconds
const unsigned long postingInterval = 3 * 1000L; // delay between updates, in milliseconds

String rcvbuf;

// Initialize the Ethernet client object
WiFiClient client;

void postData(String VARID, float data);
void printWifiStatus();
char * floatToString(char * outstr, double val, byte precision, byte widthp);

void setup()
{
  // initialize serial for debugging
  Serial.begin(115200);
  Serial.println(F("\r\nSerial Init"));

  WiFi.init();

  // check for the presence of the shield
  if (WiFi.status() == WL_NO_SHIELD) {
    Serial.println("WiFi shield not present");
    // don't continue
    while (true);
  }

  // attempt to connect to WiFi network
  while ( status != WL_CONNECTED) {
    Serial.print("Attempting to connect to WPA SSID: ");
    Serial.println(ssid);
    // Connect to WPA/WPA2 network
    status = WiFi.begin(ssid, pass);
  }

  Serial.println("You're connected to the network");

  printWifiStatus();
}

void loop() {
  //measure Temparature
  float floatTEMP = analogRead(Pin_TEMP);
  float voltage = (floatTEMP * 5000) / 1024;
  voltage = voltage - 500;
  float temperature = voltage / 10;

  while (client.available()) {
    char c = client.read();
    if ( c != NULL ) {
      if (rcvbuf.length() > 10)
        rcvbuf = "";
      rcvbuf += c;
      Serial.write(c);
    }
  }

  if (millis() - lastConnectionTime > postingInterval) {
    postData(VARID_TEMP, temperature);
  }
  rcvbuf = "";
}

void postData(String VARID, float data) {
  uint8_t content_len[6] = {0};
  String TxData;
  char charDATA[20] = "";
  floatToString(charDATA, data, 2, 7 );

  String dataString = "{\"value\": ";
  dataString += charDATA;
  dataString += '}';

  client.stop();
  if (client.connect(server, 80)) {
    Serial.println("send POST");

    // send the HTTP PUT request
    client.print("POST /api/v1.6/variables/");
    client.print(VARID);
    client.println("/values HTTP/1.1");
    client.println("Host: things.ubidots.com");
    client.print("X-Auth-Token: ");
    client.println(TOKEN);
    client.print("Content-Length:");
    client.println(itoa(dataString.length(), (char*)content_len, 10));
    client.println("Content-Type: application/json");
    client.println("Connection: close\r\n");
    client.print(dataString);
    client.println("\r\n");

    // note the time that the connection was made
    lastConnectionTime = millis();
  }
  else {
    // if you couldn't make a connection
    Serial.println("Connection failed");
  }
}

void printWifiStatus() {
  // print the SSID of the network you're attached to
  Serial.print("SSID: ");
  Serial.println(WiFi.SSID());

  // print your WiFi shield's IP address
  IPAddress ip = WiFi.localIP();
  Serial.print("IP Address: ");
  Serial.println(ip);

  // print the received signal strength
  long rssi = WiFi.RSSI();
  Serial.print("Signal strength (RSSI):");
  Serial.print(rssi);
  Serial.println(" dBm");
}

char * floatToString(char * outstr, double val, byte precision, byte widthp)
{
  char temp[16];
  byte i;

  // compute the rounding factor and fractional multiplier
  double roundingFactor = 0.5;
  unsigned long mult = 1;
  for (i = 0; i < precision; i++)
  {
    roundingFactor /= 10.0;
    mult *= 10;
  }
  temp[0] = '\0';
  outstr[0] = '\0';

  if (val < 0.0)
  {
    strcpy(outstr, "-\0");
    val = -val;
  }

  val += roundingFactor;

  strcat(outstr, itoa(int(val), temp, 10)); //prints the int part
  if ( precision > 0)
  {
    strcat(outstr, ".\0"); // print the decimal point
    unsigned long frac;
    unsigned long mult = 1;
    byte padding = precision - 1;

    while (precision--)
      mult *= 10;

    if (val >= 0)
      frac = (val - int(val)) * mult;
    else
      frac = (int(val) - val ) * mult;

    unsigned long frac1 = frac;

    while (frac1 /= 10)
      padding--;

    while (padding--)
      strcat(outstr, "0\0");

    strcat(outstr, itoa(frac, temp, 10));
  }

  // generate space padding
  if ((widthp != 0) && (widthp >= strlen(outstr)))
  {
    byte J = 0;
    J = widthp - strlen(outstr);

    for (i = 0; i < J; i++)
    {
      temp[i] = ' ';
    }

    temp[i++] = '\0';
    strcat(temp, outstr);
    strcpy(outstr, temp);
  }
  return outstr;
}
코드상에서 사용자가 작성해야 할 부분이 4곳이 있습니다.
TOKEN과 VARID는 ubidots에서 발급받아 사용하고, SSID와 PASS는 연결할 WiFi정보를 기입합니다.

VARID는 위에서 설명드렸던 것과 같이 variable에서 확인이 가능하고
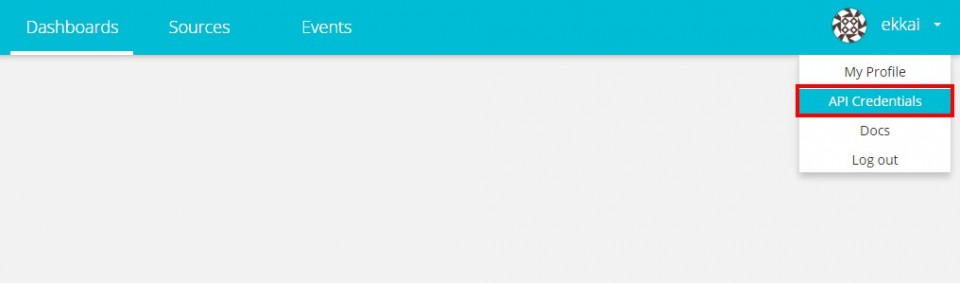
TOKEN의 경우 사이트 오른쪽 상단에 ID를 눌러 뜨는 API Credentials를 클릭하면 상단에서 확인할 수 있습니다.
위의 소스코드를 업로드 후 대시보드의 게이지를 확인하면 온도값에 따라 게이지가 변하는 모습을 볼 수 있습니다.
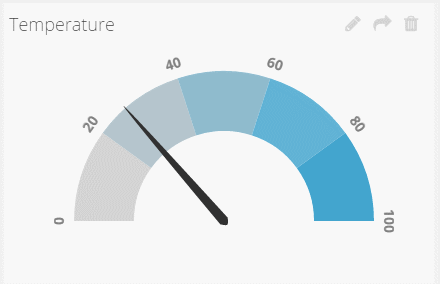
<느리지만 움직이는 이미지 입니다!>
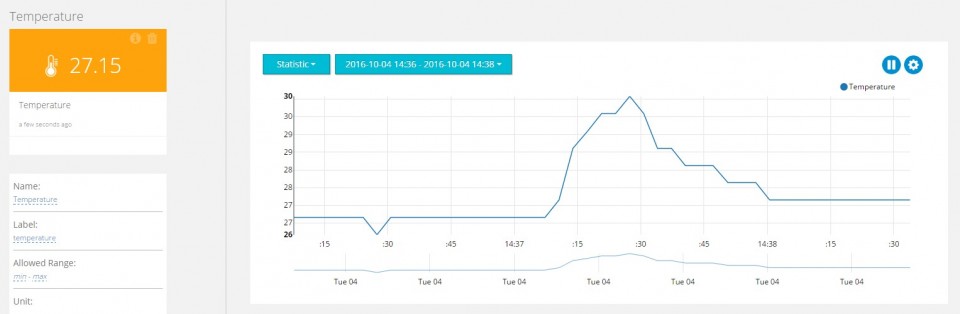
Source에서 variable을 확인하면 아래와 같이 실시간 그래프로 확인 가능합니다.


kocoafabeditor 
항상 진취적이고, 새로운 것을 추구하는 코코아팹 에디터입니다!

