코코아팹은 누구나 창의적 아이디어를 현실로 만들어 낼 수 있도록
만들고, 공유하고, 배울 수 있는 터전이
되고자 합니다.
아이디와 비밀번호를 잊으셨나요?아이디 / 비밀번호 찾기
코코아팹 회원이 아니신가요? 회원가입
2016-10-06 15:01:39

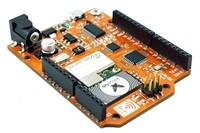
OrangeBoard WiFi는 기존 OrangeBoard에 WiFi모듈을 장착하여 하나의 보드안에서 아두이노의 기능과 WiFi를 사용할 수 있게 하였습니다.
아두이노에 수많은 데이터를 웹에서 가져올 수 있는 WiFi모듈을 결합하였기 때문에 사용자들은 기존의 아두이노보다 한 단계 더 넓은 범위를 바라보고 사용할 수 있습니다.
이번 글에서는 OrangeBoard WiFi의 모드를 AP모드로 변경시켜 공유기처럼 쓰는 방법에 대해 알아보겠습니다.
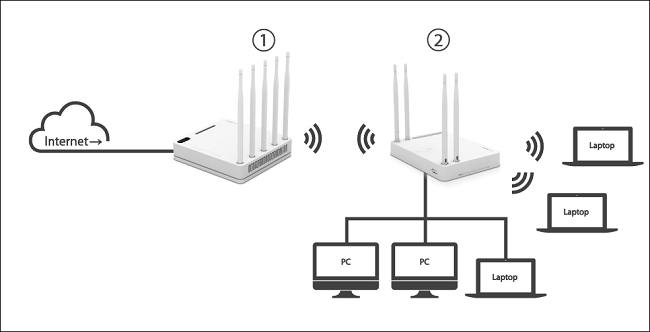
AP는 Access Point의 약자로 WiFi나 블루투스 관련 표준을 통해 무선 통신장치를 무선 네트워크로 연결해주는 장치를 말합니다. 흔히 집에 한 대씩 있는 공유기를 생각하면 편합니다.
OrangeBoard WiFi는 2가지의 모드를 제공합니다.
Station모드와 AP모드를 제공하는데 각 모드에 대해 설명하자면
Station모드는 OrangeBoard WiFi가 직접 공유기(AP)에 접속하는 방식으로 공유기에서 DHCP로 IP를 할당 받을 수도 있고, 공유기 대역의 IP를 Static으로 설정할 수도 있습니다.
Station모드를 통해 OrangeBoard WiFi는 동일한 AP에 접속한 단말기와 로컬로 데이터를 송/수신하거나, AP를 통해 외부 네트워크와 데이터를 송/수신 할 수 있습니다.
AP모드는 OrangeBoard WiFi가 AP(공유기)가 되어 다른 단말기가 OrangeBoard WiFi에 연결되는 방식입니다. 접속한 단말기는 OrangeBoard WiFi에서 IP를 할당받고, 로컬로 데이터 송/수신을 할 수 있습니다.
AP모드를 통해 로컬망에 접속한 단말기들 간의 데이터 송/수신을 하거나 OrangeBoard WiFi와의 데이터 송/수신이 가능합니다.
AP모드를 사용하면 2개의 OrangeBoard WiFi를 한 대는 AP모드, 다른 한 대는 Station모드로 설정하여 무선으로 통신하는 일이 가능해집니다.
OrangeBoard WiFi의 기본 모드는 Station모드로 설정되어 있으며 코드 상에서 모드 변경이 가능합니다.
이번 튜토리얼에는 2대의 OrangeBoard WiFi를 무선망으로 연결하여 통신하는 방법에 대해 알아보겠습니다.
| No | 부품명 | 수량 | 상세 설명 |
| 1 | OrangeBoard WiFi | 2 | WizFi250을 사용한 WiFi보드 |
| OrangeBoard WiFi |
 |
OrangeBoard WiFi의 모드를 설정하고 나면 통신 방법을 선택해야 하는데 TCP통신과 UDP통신이 있습니다.
아마 통신에 대해 알고있지는 못해도 예전 스타크래프트를 했다면 한번쯤 TCP와 UDP에 대해 보신적이 있을겁니다.
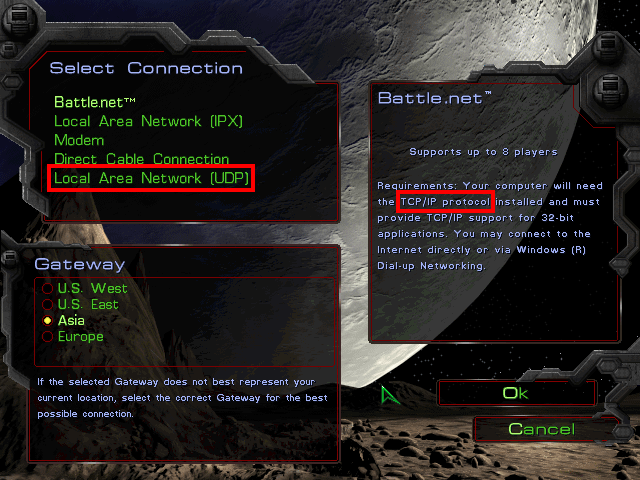
<배틀넷은 TCP/IP이고 UDP는 따로 있습니다>
TCP통신과 UDP통신은 둘 다 무선통신한다는 개념은 같으나 프로토콜이 다르기 때문에 통신 방법에 있어서 차이를 보입니다.
두 통신에 있어서 가장 두드러지는 특징을 고르라면
TCP VS UDP
연결기반(Connection-Oriented) VS 비연결기반(Connectionless)
신뢰성(Reliable) VS 비신뢰성(Unreliable)
을 뽑을 수 있습니다.
TCP통신은 HandShake(핸드쉐이크)형태라고도 불리며 통신에 있어서 항상 상대방을 식별하고 메시지 전송 후 상대방의 응답을 기다리는 연결 지향적인 특성을 가집니다.
HandShake라는 말도 악수는 두 사람이 모두 동의하에 손을 뻗어야 할 수 있기 때문에 이런 특성에서 기인한 말입니다.
또한 데이터를 전송 후 일정 Timeout기간 동안 응답이 없을 경우 다시 재전송하기 때문에 중간에 데이터가 손실될 우려가 없습니다.
가장 일반적인 통신방법이 TCP이며 www나 전자우편 등이 이에 해당합니다. 만약 전자 우편이 전송도중에 데이터가 손실됐는데 이에 대해 재전송이 없다면 전자우편으로써의 역할을 제대로 할 수 없겠죠?
더 쉬운예를 들자면 전화를 들 수 있습니다.
전화는 양쪽의 동의하에 이루어지는 통신입니다. 내가 한마디 하면 다른 쪽에서 그에 대한 응답을 하고 TCP통신과 유사한 점을 지닙니다.

반대로 UDP통신은 비신뢰적이고 상대방의 동의가 없이도 일반적으로 통신을 보내는 비연결적인 특성을 가지고 있습니다.
항상 상대방의 응답이 필요한 TCP에 비해 응답을 기다리지 않기 때문에 TCP에 비해 속도가 빠르고, 중간에 데이터가 손실되더라도 보내는 측에서는 이에 대해 알 수 없기 때문에 데이터 손실에 대한 별도의 재전송 체계가 존재하지 않습니다. 그렇기 때문에 비신뢰적이죠.
UDP통신은 인터넷에서 스트리밍 티비 서비스나 인터넷 게임에서 주로 사용되는데, 중요도가 낮은 데이터의 송수신에 많이 쓰입니다. 스트리밍 서비스는 UDP통신이기 때문에 중간중간에 끊기는 경우가 있고 끊기더라도 그 부분에 대해서는 넘어가고 다시 전송받은 데이터부터 스트림하게 됩니다.
UDP통신의 더 쉬운예를 들자면 텔레비전이나 편지를 들 수 있습니다.
텔레비전과 편지는 내가 티비를 보든 안보든, 편지를 받고 싶어하든 받고 싶지 않아하든 간에 상대방에서는 일방적으로 전송이 가능합니다.
그렇기 때문에 내가 언제든지 텔레비전을 틀어도 방송을 볼 수 있는 것이죠.

위의 두 개념은 Station/AP와는 별개의 프로토콜이기 때문에 큰 관련성은 없지만 통신을 할때 TCP를 쓸 것인지, UDP를 쓸 것인지 사용자가 정해야 하기 때문에 기본 개념은 알아두고 가는 것이 좋습니다.
#include <SPI.h>
#include "WizFi250.h"

char ssid[] = "kocoafabAP";         // your network SSID (name)
char pass[] = "0123456789";        // your network password
int status = WL_IDLE_STATUS;     // the Wifi radio's status
int reqCount = 0;                // number of requests received

WiFiServer server(80);

// use a ring buffer to increase speed and reduce memory allocation
WizFiRingBuffer buf(100);

void printWifiStatus();
void sendHttpResponse(WiFiClient client);

void setup()
{
  Serial.begin(115200);   // initialize serial for debugging
  WiFi.init();

  // check for the presence of the shield
  if (WiFi.status() == WL_NO_SHIELD) {
    Serial.println("WiFi shield not present");
    while (true); // don't continue
  }

  Serial.print("Attempting to start AP ");
  Serial.println(ssid);

  // uncomment these two lines if you want to set the IP address of the AP
  //IPAddress localIp(192, 168, 111, 111);
  //WiFi.configAP(localIp);

  // start access point
  status = WiFi.beginAP(ssid, 10, pass, ENC_TYPE_WPA2_PSK);

  Serial.println("Access point started");
  printWifiStatus();

  // start the web server on port 80
  server.begin();
  Serial.println("Server started");
}


void loop()
{
  WiFiClient client = server.available();  // listen for incoming clients

  if (client) {                               // if you get a client,
    Serial.println("New client");             // print a message out the serial port
    buf.init();                               // initialize the circular buffer
    while (client.connected()) {              // loop while the client's connected
      if (client.available()) {               // if there's bytes to read from the client,
        char c = client.read();               // read a byte, then
        buf.push(c);                          // push it to the ring buffer

        Serial.write(c);
        // you got two newline characters in a row
        // that's the end of the HTTP request, so send a response

        if (buf.endsWith("\r\n\r\n")) {
          sendHttpResponse(client);
          break;
        }
      }
    }

    // give the web browser time to receive the data
    delay(10);

    // close the connection
    client.stop();
    Serial.println("Client disconnected");
  }
}

void sendHttpResponse(WiFiClient client)
{
  client.print("OrangeBoard WiFi APmode Test!!");
}

void printWifiStatus()
{
  // print your WiFi shield's IP address
  IPAddress ip = WiFi.localIP();
  Serial.print("IP Address: ");
  Serial.println(ip);

  // print where to go in the browser
  Serial.println();
  Serial.print("To see this page in action, connect to ");
  Serial.print(ssid);
  Serial.print(" and open a browser to http://");
  Serial.println(ip);
  Serial.println();
}
#include <SPI.h>
#include "WizFi250.h"


char ssid[] = "kocoafabAP";    // your network SSID (name)
char pass[] = "0123456789";          // your network password
int status = WL_IDLE_STATUS;       // the Wifi radio's status

char server[] = "192.168.12.101";

// Initialize the Ethernet client object
WiFiClient client;

void printWifiStatus();

void setup()
{
  Serial.begin(115200);

  WiFi.init();

    // check for the presence of the shield
    if (WiFi.status() == WL_NO_SHIELD) {
      Serial.println("WiFi shield not present");
      // don't continue
      while (true);
    }

    // attempt to connect to WiFi network
    while ( status != WL_CONNECTED) {
      Serial.print("Attempting to connect to WPA SSID: ");
      Serial.println(ssid);
      // Connect to WPA/WPA2 network
      status = WiFi.begin(ssid, pass);
    }

    // you're connected now, so print out the data
    Serial.println("You're connected to the network");

    printWifiStatus();

    Serial.println();
    Serial.println("Starting connection to server...");
    // if you get a connection, report back via serial
    if (client.connect(server, 80)) {
      Serial.println("Connected to server");
      // Make a HTTP request
      client.println("Hello World!!");
      client.println();
    }
}


void loop()
{
  // if there are incoming bytes available
  // from the server, read them and print them
  while (client.available()) {
	  char c = client.read();
	  Serial.write(c);
  }

  // if the server's disconnected, stop the client
  if (!client.connected()) {
    Serial.println();
    Serial.println("Disconnecting from server...");
    client.stop();

    // do nothing forevermore
    while (true);
  }
}

void printWifiStatus()
{
  // print the SSID of the network you're attached to
  Serial.print("SSID: ");
  Serial.println(WiFi.SSID());

  // print your WiFi shield's IP address
  IPAddress ip = WiFi.localIP();
  Serial.print("IP Address: ");
  Serial.println(ip);

  // print the received signal strength
  long rssi = WiFi.RSSI();
  Serial.print("Signal strength (RSSI):");
  Serial.print(rssi);
  Serial.println(" dBm");
}
위의 두 코드를 각각의 보드에 업로드 시켜야 합니다.
보드 두 개를 사용하기 위해 아두이노 IDE를 2번 켜야 합니다.
(하나의 창을 킨 다음 새파일로 다시 오픈하는 방법이 아닌 아이콘을 2번 클릭하여 창을 2개 엽니다.)
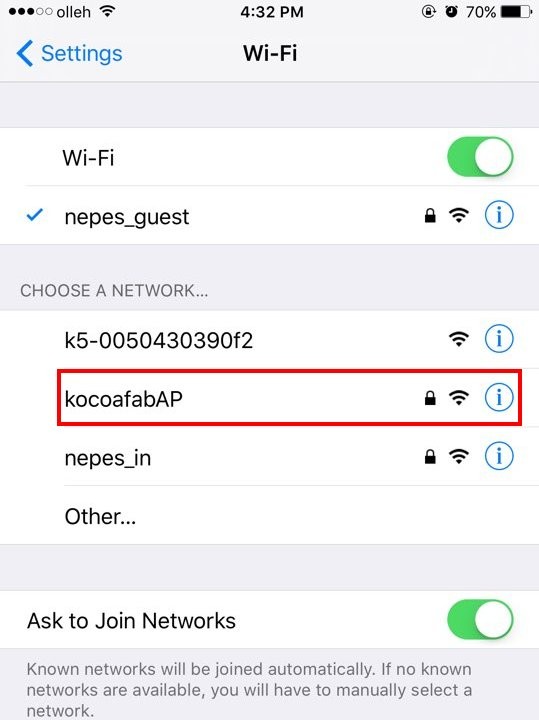
AP에서 SSID와 PASS를 입력하는데 여기서 입력한 값은 이제 클라이언트가 APMode로 설정한 보드에 접속하기 위한 WiFi가 됩니다.
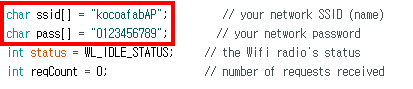
AP로 설정한 보드에 코드를 업로드 하면 아래와 같이 kocoafabAP라는 WiFi가 생긴 것을 볼 수 있습니다.
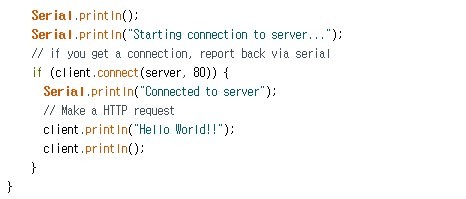
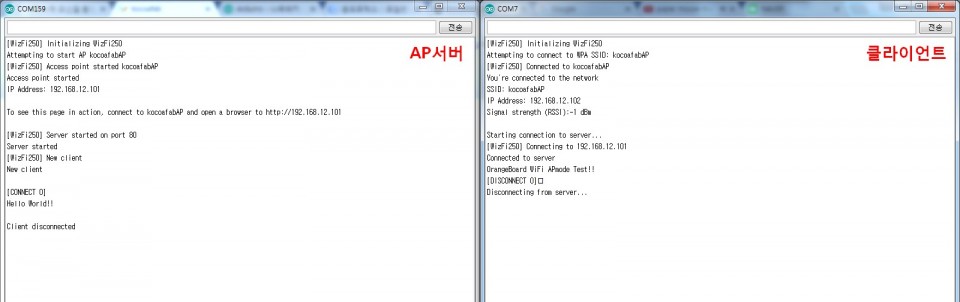
Client는 서버에 연결되면 아래 코드에서 "Hello World!!"를 서버로 전송합니다.
Server에서는 클라이언트가 접속하면 요청에 대한 응답으로 OrangeBoard WiFi APmode Test!!문구를 Client에게 전달합니다.

아래 사진에서 서버와 클라이언트가 동시에 통신을 하는것을 볼 수 있습니다.

kocoafabeditor 
항상 진취적이고, 새로운 것을 추구하는 코코아팹 에디터입니다!
 WiFi, WiFi보드, Arduino, OrangeWiFi, APmode, AP, 공유기, 통신


