
애완동물 물그릇 감지 프로젝트
2014-07-28 07:06:17
개요
여러분이 집 밖에 있거나 몸이 안 좋을 때에도 털북숭이 친구의 물 그릇을 자동으로
채워주는 알리미를 소개합니다. 두 개의 자작센서를 마이크로 컨트롤러와 연결해서
애완동물이 마시는 물 그릇의 높이를 측정해 물이 없으면 펌프를 자동으로 작동시켜
물통에서 물을 채우고, 만약 물통의 물이 모두 떨어지면 트윗을 보냅니다.
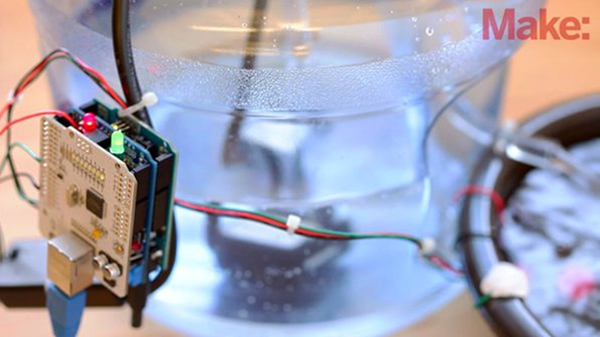
제가 만든 시스템의 중심은 아두이노 마이크로 컨트롤러로, 두 개의 센서를 읽고 물의
흐름을 제어하는 역할을 합니다. 센서는 트랜지스터에 전선 몇 개만 연결하면 간단하게
만들 수 있습니다. 물통은 어떤 크기라도 상관없지만 저는 10리터 짜리 물통을
사용했습니다. 적당히 오래 쓸 수도 있으면서 너무 무겁지는 않으니까요. 이 물통의
바닥에 설치한 수족관펌프에서 나오는 물로 물 그릇을 채우게 됩니다.
트위터 기능은 아두이노 이더넷실드(와이파이실드가 좋은 분은 와이파이 실드를 써도
됩니다)로만들었습니다. 물통이 비었거나 센서가 고장이나서 코드로 설정한 시간이
지났음에도 불구하고 물 그릇이 채워지지 않는 다면 자동으로 물통의 마개를 닫고 오류가
발생했다고 트윗을 하므로, 여러분은 금방집으로 달려와 애완동물의 물통을 채워 줄 수
있답니다.

동영상
만드는 과정
1. 회로에 센서 설치하기
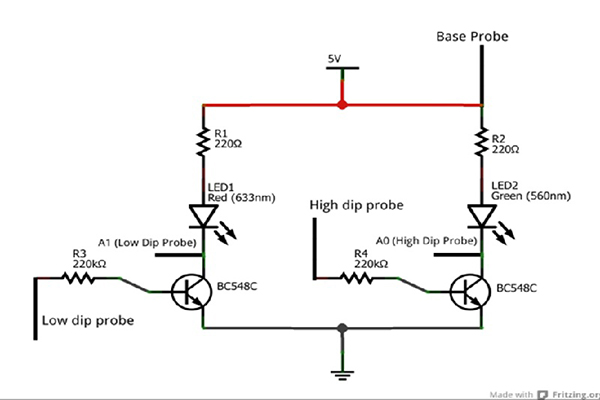
위에 보이는 도식도를 보고 물 감지 센서를 보드에 설치 하세요.
회로는 물의 높낮이를 감지 할 수 있는 두 개의 구리 전선dip probe를 가지고 있습니다.
그릇 밑부분의 있는probe에 물이 닿았을 때 감지가 되고 이런 probe의 상태를 두 개의
LED들을 통해 보여줍니다.
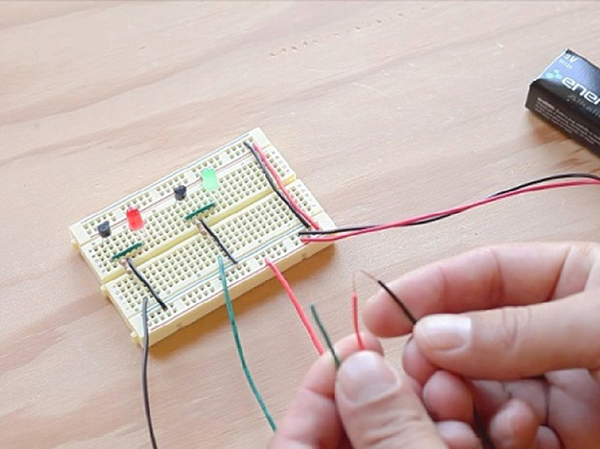
MakerShield에 납땜 하기 전에 테스트 해봅시다.
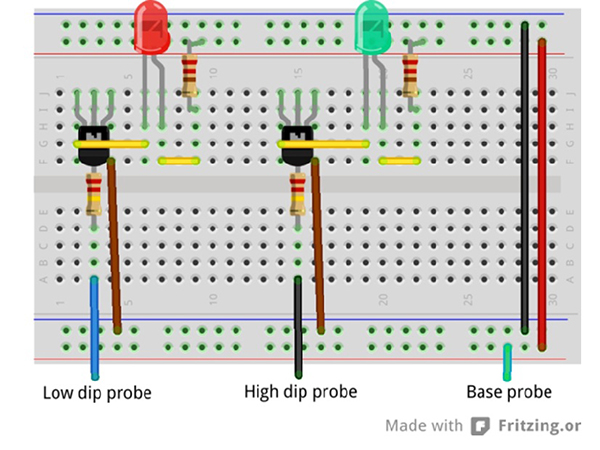
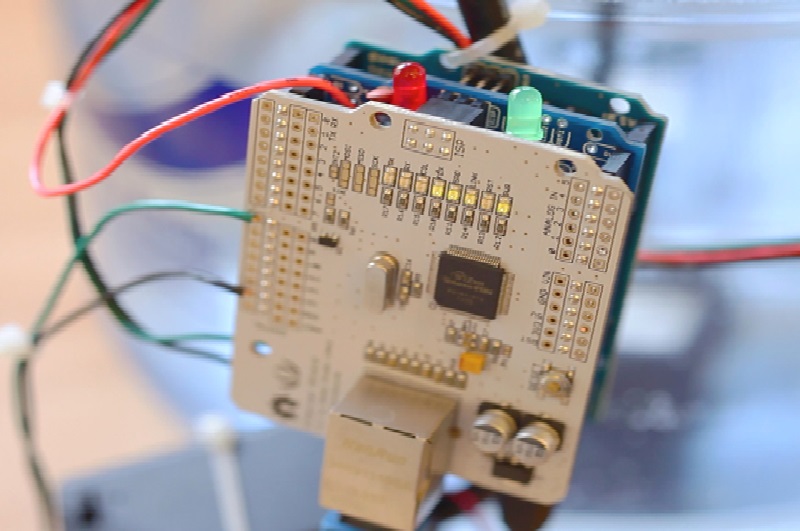
2. MakerShield에 넣기
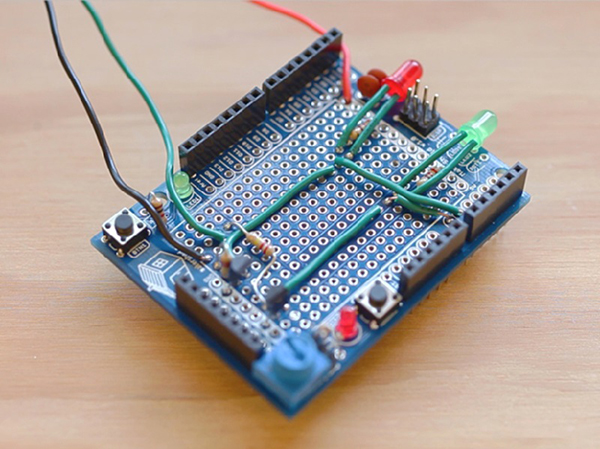
위에 보이는 MakerShield에 센서 회로를 납땜하세요.아두이노를 통해 센서의 상태를
나타내기 위해서는 트랜지스터의 콜렉터와MakerShield의 컨텍트 패드를 한 쌍의
전선으로 연결 해야 합니다. 각 probe와 연결된 트렌지스터의콜렉터의 전압을
측정하세요. 물에 있으면 센서가 켜지고 물 밖이면 센서가 꺼지는 원리입니다. 이 때의
측정된 전압을 코드에서 사용할 것입니다. 또한 컬렉터는LED의 음극과 연결 되어
있습니다.3. 센서를 물그릇에 붙이세요.

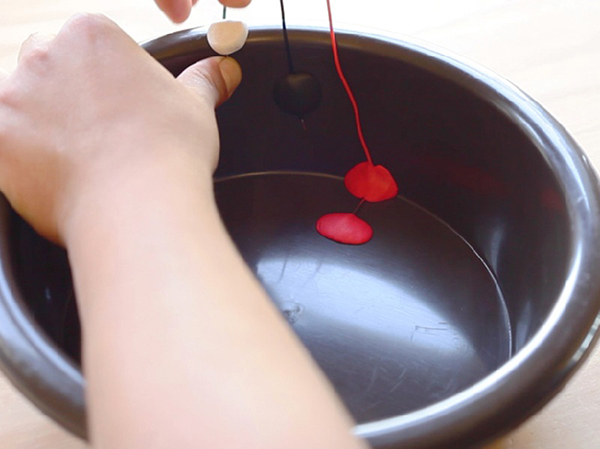

전선의 몇 인치의 절연 부분을 벗깁니다. 그리고 Sugru를 통해 물 그릇 및 부분에
붙입니다. 높낮이를 측정하는 probe 들은 벽의 측면에 붙입니다.
4. 물통을 준비하세요.
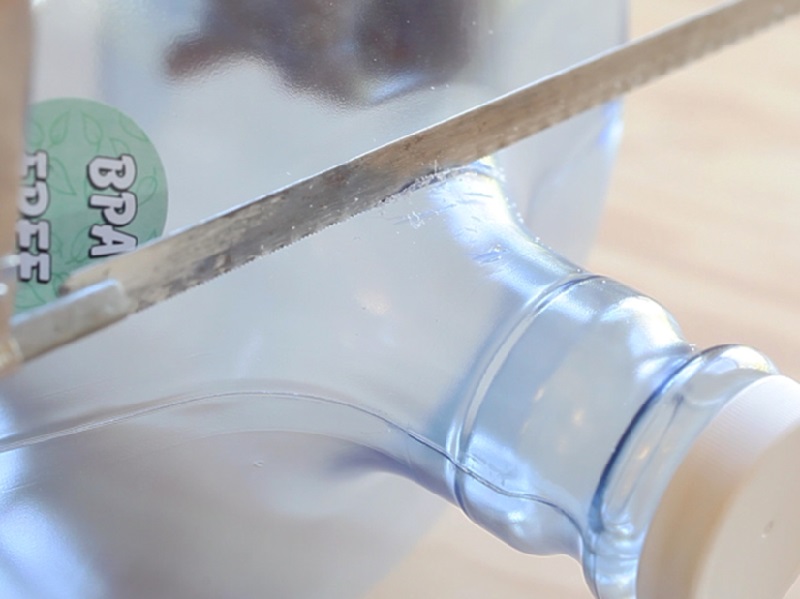
물을 공급하는 물통으로 쓸 통의 입구를 펌프가 들어 갈 만큼의 크기를 만들기 위해
잘라주세요.
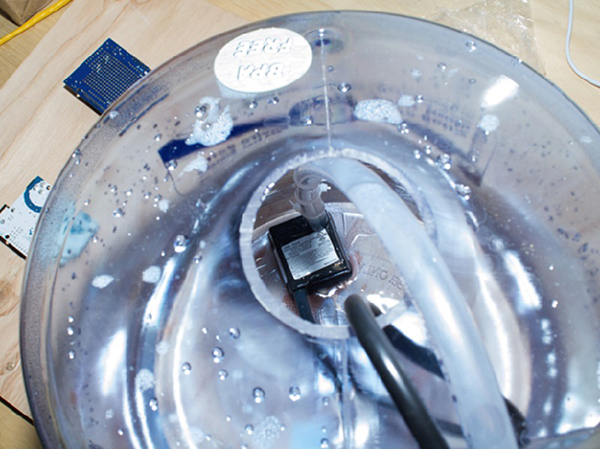
펌프 호스를 연결하세요.
바닥에 호스를 고정하세요.
물통 안에는 있는 호스 윗 부분에 1/8만큼의 구멍을 뚫어 주세요. 이런 작은 구멍은
스위치가 꺼졌을 때 물이 옮겨지는 것을 방지할 것 입니다.
5. 아두이노를 프로그래밍 하세요.
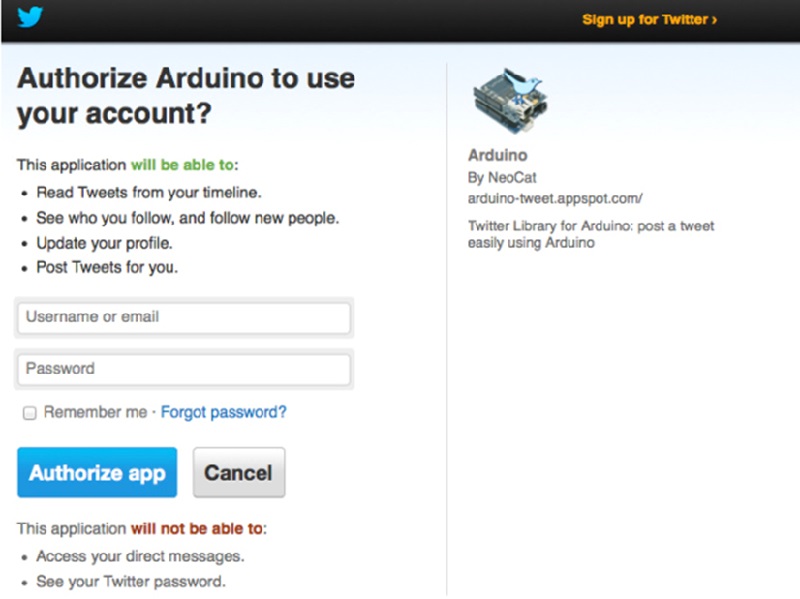
물 관리인에게 트윗을 보내려면 OAuth토큰이 필요합니다. 하나를 여기서 얻을 수
있습니다. (맨 밑에 링크 있습니다.)
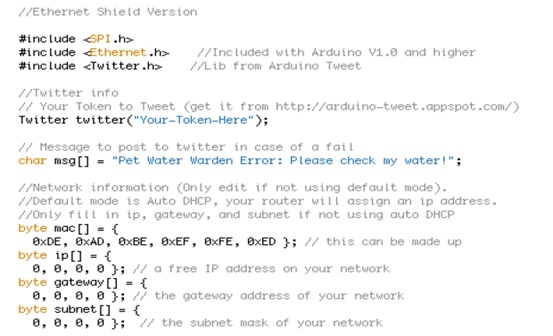
토큰을 얻은 후 아두이노를 위한 트윗 라이브러리를 다운 받습니다. 코드는 뒷 부분에
있습니다. 아두이노개발환경툴을 열고 토큰을 복사한후아두이노 보드에 업로드 하세요
코드는 SPI(serial communication), 트위터 등 의 라이브러리도 가지고 있습니다. 즉,
아두이노가 쉽게 통신할 수 있습니다. IP 주소를 입력하고PowerSwitch Tail을 통제하기
위해 아두이노의 핀 8을 설정하세요. 다음Ethernet 연결을 설정하고 물 센서의 상태를
확인하세요.
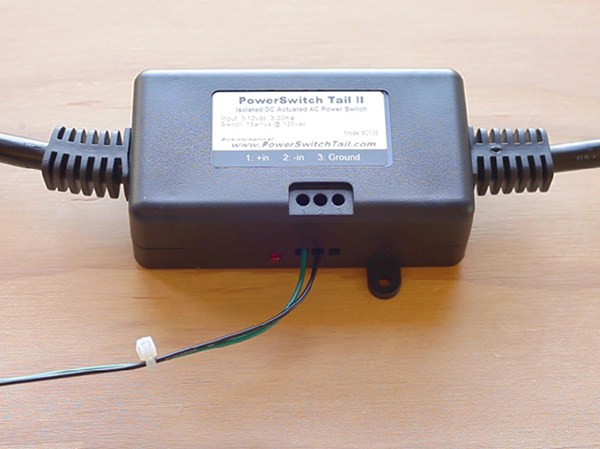
6. 모든 것을 연결 하세요.
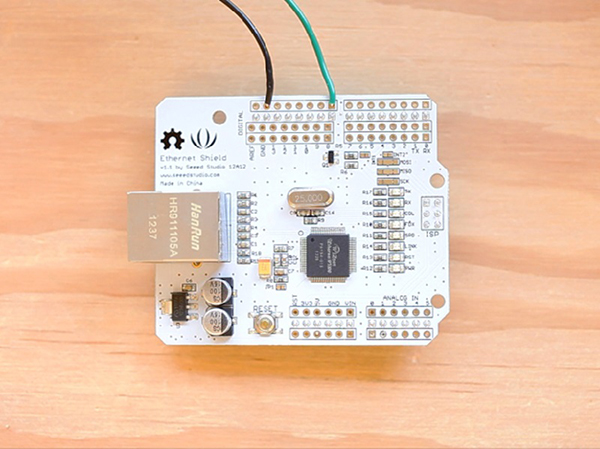
위에 보이는 것 처럼PowerSwitch Tail을 Ethernetshield에 납땜하세요: 전원스위치
테일(-)와 아두이노 지면과 연결하고 (+)부분을 아두이노 핀 8과 연결하세요.
MakerShield를 아두이노에 플러그 하세요. 또Ethernetshield를MakerShield에 플러그
하세요.
펌프를PowerSwitch Tail에 플러그 하세요. 애완용 물 그릇의 호스를 작동시킵니다.
두 번 확인 하는 probe들과 펌프를 아두이노와 연결 하세요. 이제, 모두 연결이 되었고
프로그램을 올리세요. 마지막으로 9V 배터리를 아두이노에 연결 하세요.
7. 아두이노 코드를 살펴보십시요.
/************************************************
  * Author: Eloy Salinas
  * Project: Pet Water Warden
  * Company: Make Magazine // RadioShack
  * Date: 8/8/13
  * Version: 1.0
  * http://makezine.com/projects/petwaterwarden/
  *************************************************/
  //Twitter capabilities thanks to http://arduino-tweet.appspot.com/


  //Ethernet Shield Version

  #include <SPI.h>
  #include <Ethernet.h>//Included with Arduino V1.0 and higher
  #include <Twitter.h>//Lib from Arduino Tweet

  //Twitter info
  // Your Token to Tweet (get it from http://arduino-tweet.appspot.com/)
  Twitter twitter("Your-Token-Here");

  // Message to post to twitter in case of a fail
  charmsg[] ="Pet Water Warden Error: Please check my water!";

  //Network information (Only edit if not using default mode).
  //Default mode is Auto DHCP, your router will assign an ip address.
  //Only fill in ip, gateway, and subnet if not using auto DHCP
  byte mac[] = {
    0xDE, 0xAD, 0xBE, 0xEF, 0xFE, 0xED }; // this can be made up
  byteip[] = {
    0, 0, 0, 0 }; // a free IP address on your network
  byte gateway[] = {
    0, 0, 0, 0 }; // the gateway address of your network
  byte subnet[] = {
    0, 0, 0, 0 };  // the subnet mask of your network

  //Set output pin 8 to control switchtail/pump
  constint pump =8;

  //Failsafe off
  longtimerA=0;
  intwardenFailed=0; // Flag incase something goes wrong

voidsetup() {
  // initialize serial communication at 9600 bits per second:
  Serial.begin(9600);

  //Set pump output pin
  pinMode(pump, OUTPUT);

  //Start with pump off
  digitalWrite(pump, LOW);


  //If not using auto DHCP use Ethernet.begin(mac, ip, gateway, subnet);
  Ethernet.begin(mac);  //begins the Ethernet connection and uses automatic DHCP
  Serial.begin(9600);  // starts serial communications so we can debug easier
  delay(1000);        // a 1 second delay to let everything settle down!

  // attempt a DHCP connection:
  Serial.println("Attempting to get an IP address using DHCP:");
  if (!Ethernet.begin(mac)) {
    // if DHCP fails, start with a hard-coded address:
    Serial.println("failed to get an IP address using DHCP, trying manually");
    Ethernet.begin(mac, ip);
  }
  Serial.print("My address:");
  Serial.println(Ethernet.localIP());

  //Test Twitter
  Serial.println("Pet Water Warden testing twitter connection...");

  if (twitter.post("Pet Water Warden is up and running!!")) {  // Twitter that we are up and running
    int status =twitter.wait(&Serial);     // wait for a response from twitter
    if (status ==200) {    // if Twitter responds 200
      Serial.println(", Tweet is OK!");  // print success
      Serial.println();  // print a blank line, used for debugging
    }
    else {
      Serial.print("Tweet failed : code ");
      Serial.println(status);  // print error code
      Serial.println();  // print a blank line, used for debugging
    }
  }
  else {
    Serial.println("Connection to Twitter failed.");
  }

}


voidloop(){

  //Read the input on A0-A1
  //High and Low Sensors
  intsensorLow=analogRead(A1);
  intsensorHigh=analogRead(A0);

  //Convert to a voltage
  floatvoltageLow=sensorLow* (5.0/1023.0);
  floatvoltageHigh=sensorHigh* (5.0/1023.0);

  //Sensor States
  intlowState=0;
  inthighState=0;

  //Are the sensors on or off?
  //Write states, voltage comparison values may need to be adjusted depending on your transistor
  //and if you are using extneral or the MakerShields LEDs
  if (voltageLow>=3.3){lowState=0;}
  elseif (voltageLow<3.3){lowState=1;}

  if (voltageHigh>=3.3){highState=0;}
  elseif (voltageHigh<3.3){highState=1;}

  //Turn on the pump?
  if(highState==1&&lowState==1&&wardenFailed==0){
    digitalWrite(pump, LOW);
    timerA=0;
  }elseif(highState==0&&digitalRead(pump) == LOW &&wardenFailed==0){
    //FailSafe Timers
    timerA=0;
    digitalWrite(pump, HIGH);
    timerA=millis();
    Serial.print("Starting timer: ");
    Serial.println(timerA);
  }

  //My pet bowl fills in about 45 sec, adjust to the size
  // of your pet bowl
  if( (millis() -timerA) >=45000&&timerA!=0){
    digitalWrite(pump, LOW);
    Serial.println(timerA);
    Serial.println(millis());
    timerA=0;
    //Either no water left or the pump didn't turn off, bad sensor?
    tweetFail();
    wardenFailed=1; // the Pet Warden Warden has run into trouble and failed
    Serial.print("Something went wrong! The wardenFailed status is: ");
    Serial.println(wardenFailed);
    exit(0);// exit the program until error is fixed
    Serial.println("Either no water left or the pump didn't turn off, bad sensor?");
  }


  //Debug Prints
  Serial.print("Low Sensor: ");
  Serial.println(lowState);
  Serial.print("High Sensor: ");
  Serial.println(highState);
  Serial.println(voltageLow);
  Serial.println(voltageHigh);

  //Check Sensors every 10 sec
  delay(10000);


}


voidtweetFail(){
    if (twitter.post(msg)) {  // Twitter that we are up and running
    int status =twitter.wait(&Serial);     // wait for a response from twitter
    if (status ==200) {    // if Twitter responds 200
      Serial.println(", Tweet is OK!");  // print success
      Serial.println();  // print a blank line, used for debugging
    }
    else {
      Serial.print("Tweet failed : code ");
      Serial.println(status);  // print error code
      Serial.println();  // print a blank line, used for debugging
      //If Tweet fails try again
      tweetFail();
    }
  }
  else {
    Serial.println("Connection to Twitter failed.");
  }
}
setup함수는 펌프가 꺼지는 것을 방지합니다. 다음 와이파이나이더넷을 감지합니다.
프로그램은 SSID와 연결하고 자동으로 DHCP에 비밀번호를 설정하려고 할 것입니다.
인터넷 연결을 확인한 후 트위터 계좌가 테스트 되고 시리얼 모니터로 결과가 보내질
것입니다.
아두이노의 아날로그 핀을 읽음으로써 메인 프로그램이 시작합니다. 값은 센서를
감지하기 위해 0에서 5V 사이의 전압이 변환 됩니다. Probe가 어떤 전압 값을 주는지
보려면 시리얼 모니터 콘솔을 사용하세요. 아마 물의 양, 물과 센서의 거리, 물의 질
등을 조절해야 할 것입니다. 만약 높이 있는 probe에 물이 닿지 않고 펌프가
꺼져있다면 코드는 펌프를 키고 타이머를 작동시킵니다.
전선 probe의 산화를 늦추기 위해 루프함수는 10초마다 실행 됩니다. 코드안에서
바꿀 수 도 있습니다.
펌프와 연결된 핀도 변경 할 수 있습니다. 핀7은 와이파이 버전에 사용되기 때문에
주의하세요. 아날로그 인풋 핀은 주로 A0과 A1을 사용합니다. 또한 트윗메세지도
변경할 수 있습니다.관련링크


kocoafab
 애완동물, 아두이노, 아날로그, 감지, 물그릇, 회로 센서, 설치, 패드, 트랜지스터, 납땜, makershield, 펌프, 스위치, 프로그래밍, 토큰, Oauth
