
Ubidots 클라우드와 연동하여 원격으로 LED 제어하기
2016-08-29 17:00:43

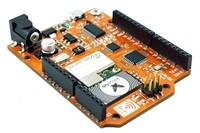
OrangeBoard WiFi는 기존 OrangeBoard에 WiFi모듈을 장착하여 하나의 보드안에서 아두이노의 기능과 WiFi를 사용할 수 있게 하였습니다.
아두이노에 수많은 데이터를 웹에서 가져올 수 있는 WiFi모듈을 결합하였기 때문에 사용자들은 기존의 아두이노보다 한 단계 더 넓은 범위를 바라보고 사용할 수 있습니다.
개요
이번 튜토리얼에서는 IoT 클라우드 서비스 중 하나인 Ubidots를 OrangeBoard WiFi를 통해 사용하는 방법에 대해 알아보겠습니다.

내가 알고싶은 데이터나 별도로 관리하고 싶은 데이터가 있을 때 보통은 개인이 사비로 서버를 구매해서 그 서버를 통해 데이터를 관리하게 됩니다.
하지만 IoT 클라우드 서비스는 그렇게 개인이 서버를 구매할 필요 없이 클라우드 서비스를 제공함으로써 각 사용자들이 손쉽게 여러가지 IoT서비스를 사용하고 정보를 한 눈에 볼 수 있도록 도와줍니다.

Ubidots는 대표적인 IoT 웹 클라우드 서비스 업체 중 하나로, 데이터에 맞게 차트를 그리거나, 컨트롤러 제공, 테이블 제작 등 다양한 기능을 제공하고 있습니다.
근데 아두이노에 WiFi를 장착하면 이런 클라우드 서비스를 쉽게 사용할 수 있습니다. 그렇기에 OrangeBoard WiFi로도 쉽게 사용할 수 있습니다!
이번 글에서는 Ubidots에 접속하여 WiFi를 사용해 LED를 컨트롤하는 버튼을 만들어 보겠습니다.
동영상
필요한 부품 목록
| No | 부품명 | 수량 | 상세 설명 |
| 1 | OrangeBoard WiFi | 1 | WizFi250을 사용한 WiFi보드 |
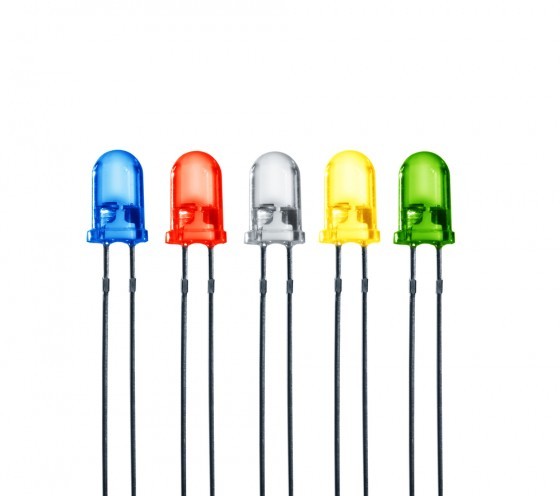
| 2 | LED | 1 | |
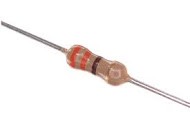
| 3 | 저항 | 1 | 330ohm |
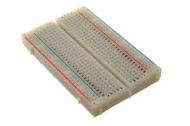
| 4 | 브레드 보드 | 1 | |
| 5 | 점퍼 케이블 | 2 |
| OrangeBoard WiFi | 조도 센서 | 저항 | 브레드 보드 | 점퍼 케이블 |
 |
 |
 |
 |
 |
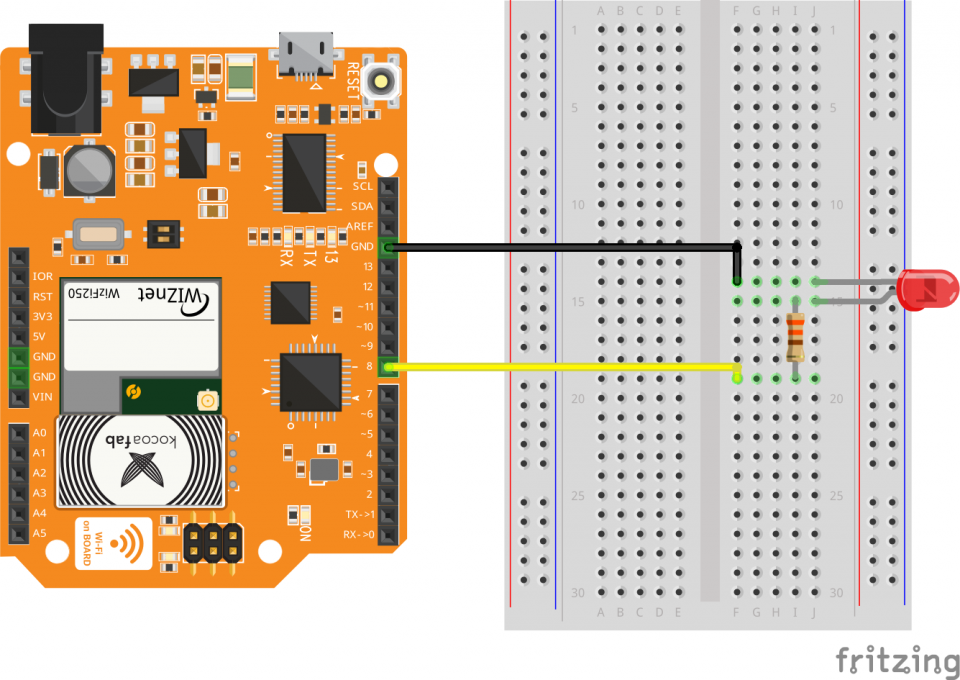
하드웨어 making
※ 아래의 핀은 WiFi모듈과 오렌지 보드 간 통신(SPI통신)을 위해 사용되는 핀이니 사용이 불가한 점을 유의해야 합니다.
혹시 아래 핀에 연결된 선이 있다면 사용이 중복되기 때문에 다른 핀에 연결해야 합니다.
| Pin Number | WizFi250 |
| D4 | WIFI_SS |
| D2 | WIFI_RESET |
| D3 | WIFI_DATA_READY(GPIO14) |
| D11 | WIFI_MOSI |
| D13 | WIFI_SCK |
| D12 | WIFI_MISO |
브레드 보드
전자 회로도

Ubidots이용하기
ubidots사이트에 접속합니다.
https://ubidots.com/에 접속한 다음 오른쪽 상단에 있는 로그인 단추를 클릭하여 로그인을 합니다.
만약 계정이 없을 경우 SIGN UP을 눌러 회원가입을 먼저 합니다.

로그인을 하고 나면 아래와 같은 화면을 볼 수 있습니다.
중앙 상단에는 Dashboards와 Sources, Events버튼을 볼 수 있습니다. 각각 탭의 기능을 간단하게 설명하면 아래와 같습니다.
Dashboards - 여러 정보를 가공하여 데이터화 시키거나 제어할 수 있는 인터페이스를 제공한다.
Sources - VARID를 제공하여 특정 제품(아두이노와 같은 보드)으로부터 데이터를 받아서 수치화시킨다.
Events - 조건을 만들어서 조건에 부합할 경우 다양한 기능을 실행한다.(ex. SMS송신, e-mail송신, request URL 등)
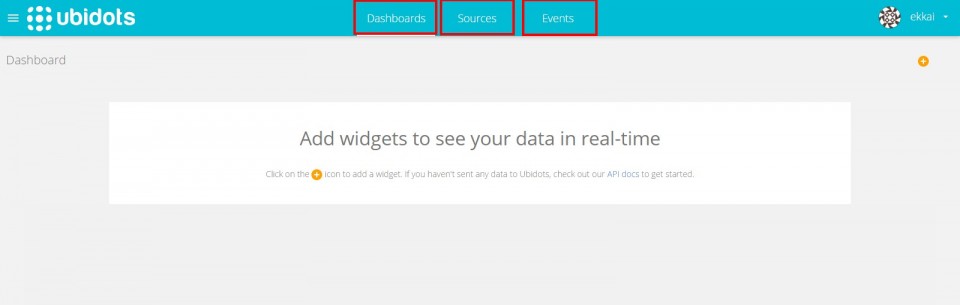
이 중에서 LED에 제어하기 위해서는 Sources탭과 Dashboard탭을 사용합니다.
먼저 Sources탭을 클릭합니다.
Sources탭에서 Add Data Source를 클릭하여 새로운 소스를 생성합니다.
데이터 소스를 생성하고 나면 이름을 변경할 수 있습니다. 여기서는 이름을 LED control로 수정하였습니다.
그 다음 데이터 소스를 클릭하여 내부 페이지로 들어갑니다.

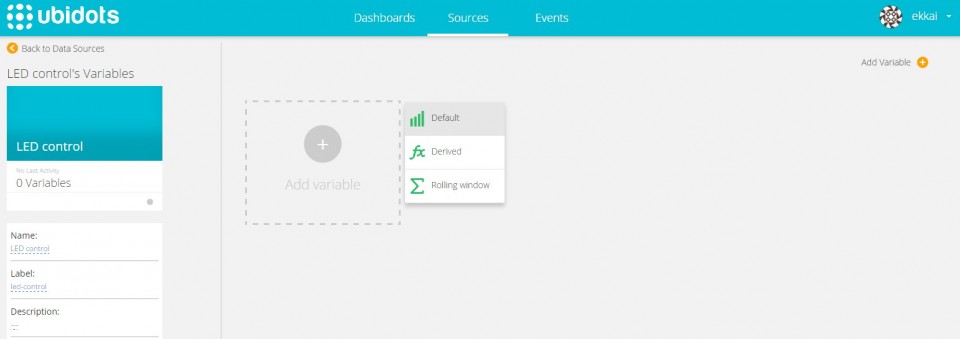
Add variable를 클릭하여 변수를 생성합니다.
클릭하면 아래 사진처럼 3가지 종류가 옆에 뜨는데 Default를 클릭합니다.
variable 생성에 성공하였습니다!
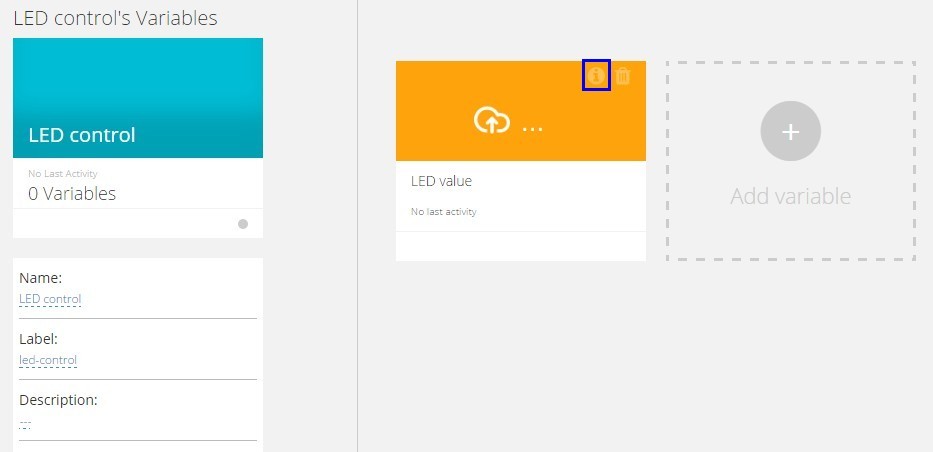
Data Source와 같이 이름이 수정 가능한데 LED value로 하겠습니다.
그리고 중요한 것이 있는데 variable상자의 우측 상단(노란 박스)을 보시면 동그라미안에 i라고 써있는 버튼이 있습니다. 이 버튼을 클릭하면 이 variable과 연결할 수 있는 VARID를 볼 수 있습니다. 코드상에서 별도로 사용해야 하기 때문에 따로 복사해줍니다.
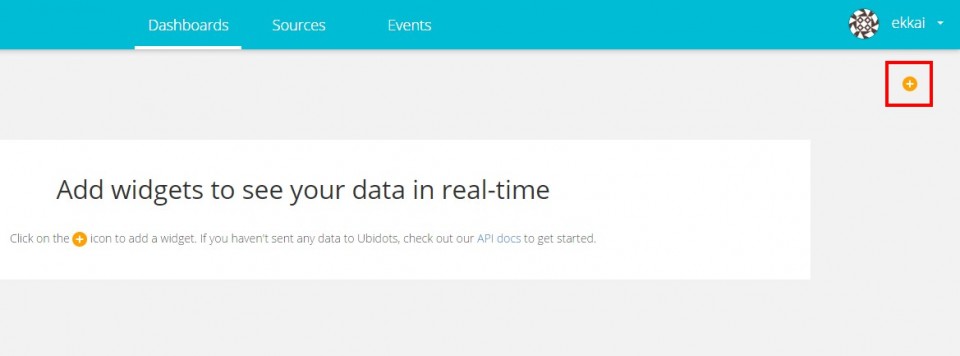
여기까지 성공했다면 Sources탭에서의 작업은 끝나게됩니다. 이제 Dashboards탭으로 넘어갑니다.
대시보드를 새로 생성하기 위해 오른쪽 상단에 +버튼을 클릭합니다.
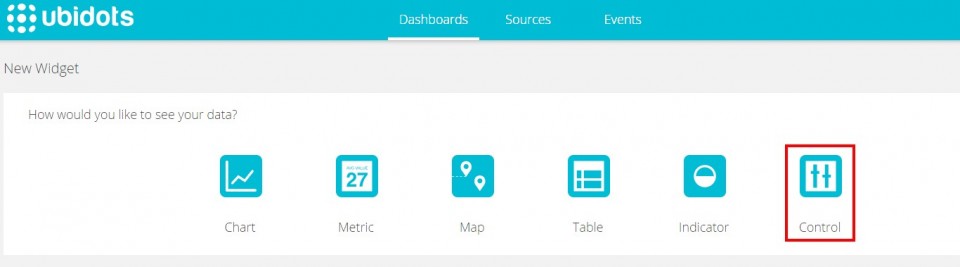
이제부터는 단계별로 내려가면서 클릭하게 되는데 LED를 제어하는 스위치를 만들어야 하기 때문에 아래와 같은 순서대로 클릭합니다.

데이터소스를 선택할때는 아까 위에서 만들었던 것을 선택합니다.

데이터소스안에 변수를 클릭합니다.

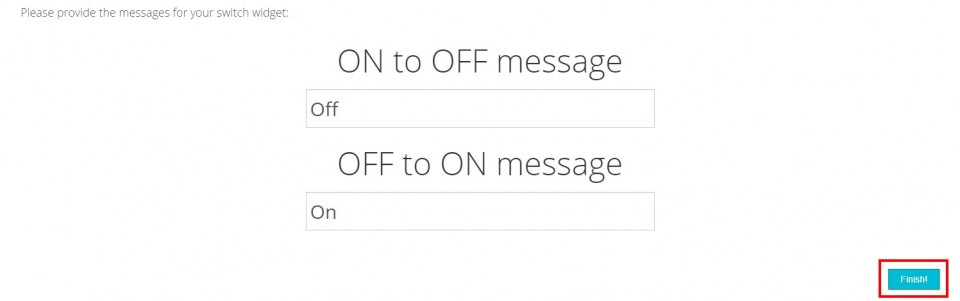
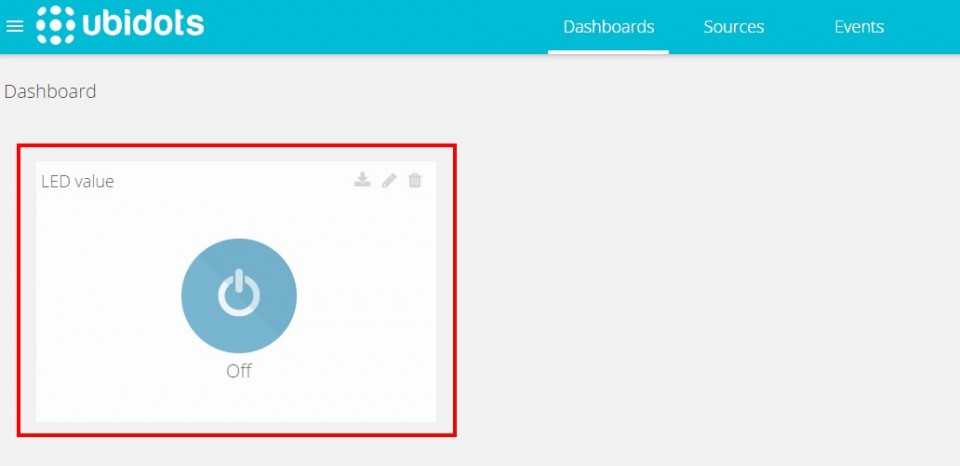
위 순서대로 잘 만들었다면 아래 사진처럼 LED를 제어할 수 있는 버튼이 생깁니다. 가운데 버튼을 클릭하면 색깔이 바뀌는 것을 볼 수 있습니다.
여기까지 완료했다면 Ubidots에서 해야할 작업은 끝나게 됩니다.
소프트웨어 Coding
#include <SPI.h>
#include "WizFi250.h"

int getInt(String input);

//Ubidots information
#define TOKEN      "TOKEN"
#define VARID      "VARID"

//Parse JSON
#define PARSE       "\"value\""
#define ENDPARSE    ","

char ssid[] = "SSID";       // your network SSID (name)
char pass[] = "PASS";        // your network password
int status = WL_IDLE_STATUS;       // the Wifi radio's status

//Hardware Pin status
#define Pin_LED_Red      8

char server[] = "thing.ubidots.com";

unsigned long lastConnectionTime = 0;         // last time you connected to the server, in milliseconds
const unsigned long postingInterval = 1000L; // delay between updates, in milliseconds

boolean readingVal;
boolean getIsConnected = false;
String valString;
int val, temp;

String rcvbuf;

// Initialize the Ethernet client object
WiFiClient client;

void httpRequest();
void printWifiStatus();

void setup()
{
  // initialize serial for debugging
  Serial.begin(115200);
  Serial.println(F("\r\nSerial Init"));

  pinMode(Pin_LED_Red, OUTPUT);   //added
  digitalWrite(Pin_LED_Red, LOW);

  WiFi.init();

  // check for the presence of the shield
  if (WiFi.status() == WL_NO_SHIELD) {
    Serial.println("WiFi shield not present");
    // don't continue
    while (true);
  }

  // attempt to connect to WiFi network
  while ( status != WL_CONNECTED) {
    Serial.print("Attempting to connect to WPA SSID: ");
    Serial.println(ssid);
    // Connect to WPA/WPA2 network
    status = WiFi.begin(ssid, pass);
  }

  Serial.println("You're connected to the network");

  printWifiStatus();
}

void loop() {
  // if there's incoming data from the net connection send it out the serial port
  // this is for debugging purposes only
  while (client.available()) {
    char c = client.read();
    if ( c != NULL ) {
      if (rcvbuf.length() > 20)
        rcvbuf = "";
      rcvbuf += c;
      Serial.write(c);
    }
    if ( rcvbuf.endsWith("\"value\": ")) {
      readingVal = true;
      valString = "";
    }

    if (readingVal) {
      if (c != '.') {
        valString += c;
      }
      else {
        readingVal = false;
      }
    }
  }
  // if 10 seconds have passed since your last connection,
  // then connect again and send data
  if (millis() - lastConnectionTime > postingInterval) {
    if (getIsConnected) {
      Serial.print(F("value : "));
      val = getInt(valString);
      Serial.println(val);
      Serial.print(F("LED is "));
      //Serial.println(rcv_value);
      if (val) {
        Serial.println(F("ON"));
        digitalWrite(Pin_LED_Red, HIGH);
      }
      else {
        Serial.println(F("OFF"));
        digitalWrite(Pin_LED_Red, LOW);
      }
    }

    httpRequest();
  }
  rcvbuf = "";
}

// this method makes a HTTP connection to the server
void httpRequest() {
  Serial.println();

  // close any connection before send a new request
  // this will free the socket on the WiFi shield
  client.stop();

  // if there's a successful connection
  if (client.connect(server, 80)) {
    Serial.println("Connecting...");

    // send the HTTP PUT request
    client.print("GET /api/v1.6/variables/");
    client.print(VARID);
    client.println(" HTTP/1.1");
    client.println("Host: things.ubidots.com");
    client.print("X-Auth-Token: ");
    client.println(TOKEN);
    client.println("Content-Type: application/json");
    client.println("Connection: close\r\n");

    // note the time that the connection was made
    lastConnectionTime = millis();
    getIsConnected = true;
  }
  else {
    // if you couldn't make a connection
    Serial.println("Connection failed");
    getIsConnected = false;
  }
}


void printWifiStatus() {
  // print the SSID of the network you're attached to
  Serial.print("SSID: ");
  Serial.println(WiFi.SSID());

  // print your WiFi shield's IP address
  IPAddress ip = WiFi.localIP();
  Serial.print("IP Address: ");
  Serial.println(ip);

  // print the received signal strength
  long rssi = WiFi.RSSI();
  Serial.print("Signal strength (RSSI):");
  Serial.print(rssi);
  Serial.println(" dBm");
}

int getInt(String input) {
  char carray[20];
  //Serial.println(input);
  input.toCharArray(carray, sizeof(carray));
  //Serial.println(carray);
  temp = atoi(carray);
  return temp;
}
코드상에서 사용자가 작성해야 할 부분이 4곳이 있습니다.
TOKEN과 VARID는 ubidots에서 발급받아 사용하고, SSID와 PASS는 연결할 WiFi정보를 기입합니다.

VARID는 위에서 설명드렸던 것과 같이 variable에서 확인이 가능하고
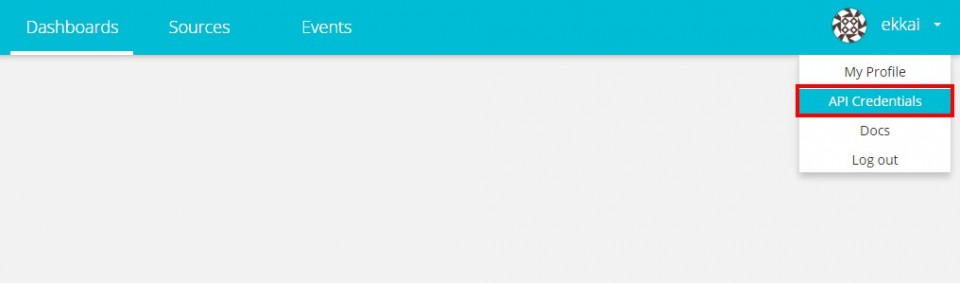
TOKEN의 경우 사이트 오른쪽 상단에 ID를 눌러 뜨는 API Credentials를 클릭하면 상단에서 확인할 수 있습니다.

기본 정보를 기입 후 코드를 OrangeBoard WiFi에 업로드 시킵니다.
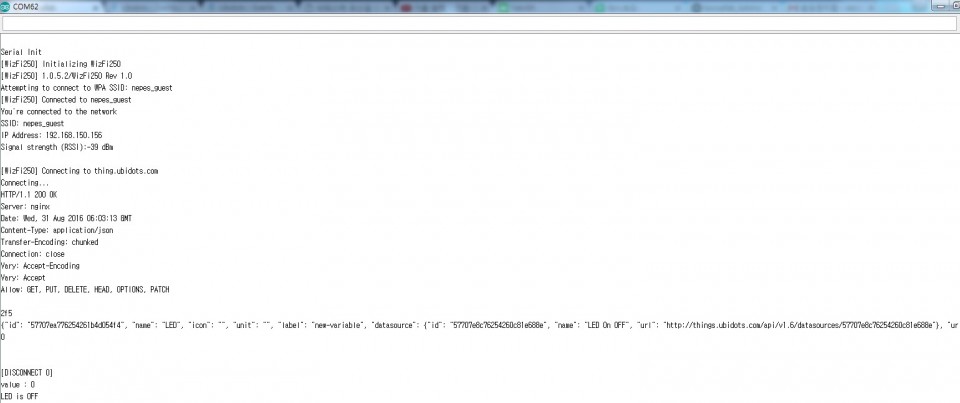
업로드가 완료되고 시리얼모니터를 확인하면 아래와 같이 Ubidots에서 계속적으로 데이터를 읽어오는 것을 확인 할 수 있습니다.


kocoafabeditor 
항상 진취적이고, 새로운 것을 추구하는 코코아팹 에디터입니다!
 Arduino, OrangeBoard, WiFi, 와이파이, IoT, 클라우드, Cloud
