2014-10-06 17:10:00
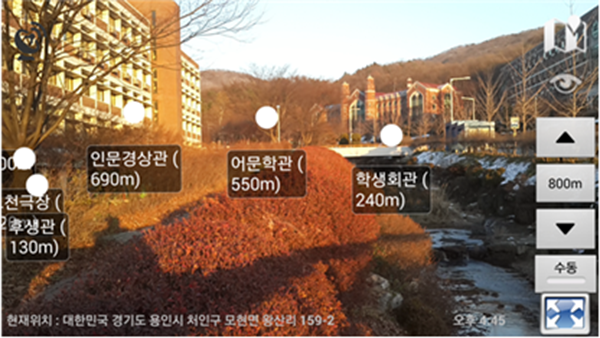
GPS는 세 개 이상의 GPS위성으로 부터 송신된 신호를 수신하여 위성과 수신기의 위치를 결정합니다.
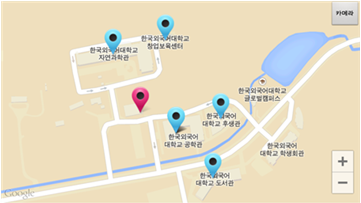
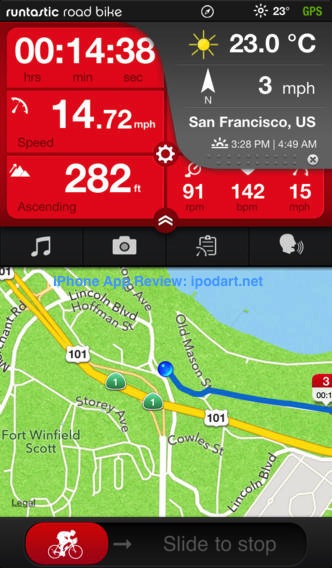
이를통해 현재 위치를 확인해서 주변의 건물 위치와 비교하여 네비게이션을 만들 수도 있고,
| NO | 부품명 | 수량 | 상세설명 |
| 1 | 오렌지 보드 | 1 | 아두이노 |
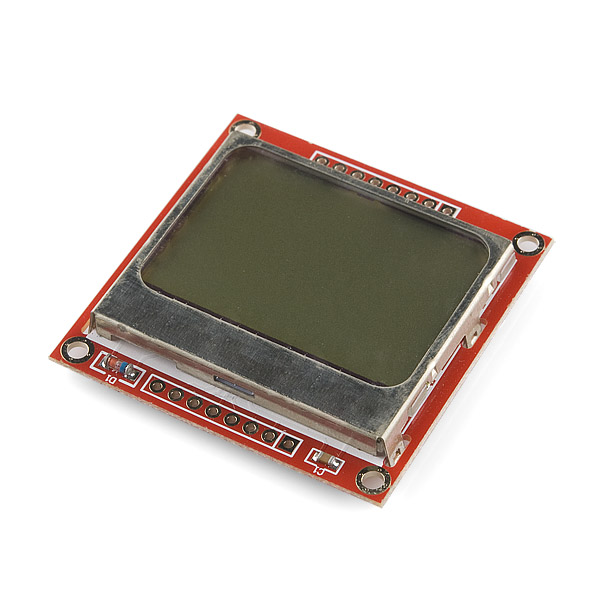
| 2 | Nokia 5110 LCD | 1 | LCD |
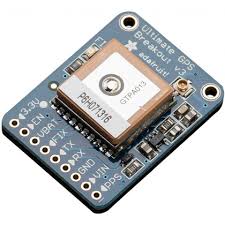
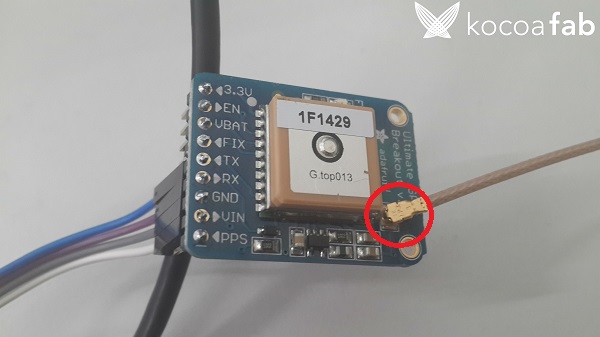
| 3 | Adafruit Ultimate GPS | 1 | GPS |
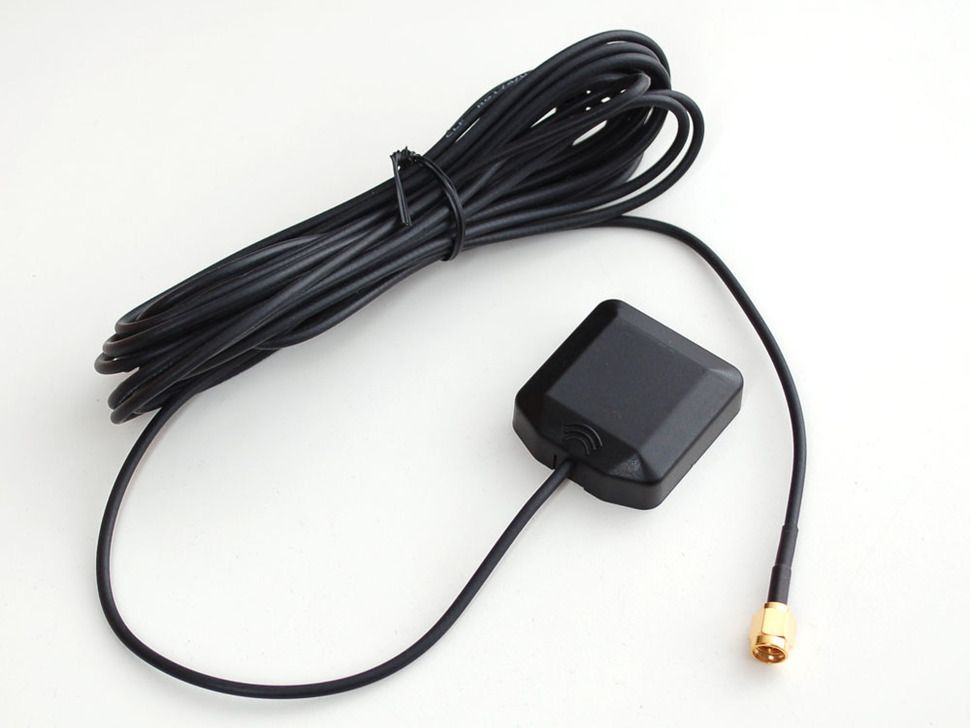
| 4 | GPS Antenna | 1 | GPS |
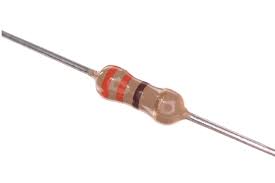
| 5 | 10KΩ 저항 | 4 | 저항 |
| 6 | 1KΩ 저항 | 1 | 저항 |
| 7 | 330Ω 저항 | 1 | 저항 |
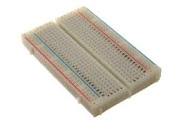
| 8 | 브레드보드 | 1 | 브레드보드 |
| 9 | 점퍼케이블 | 15 | 점퍼케이블 |
| 부품명 | 오렌지 보드 | Nokia 5110 LCD | Ultimate GPS | GPS Antenna |
| 파트 | 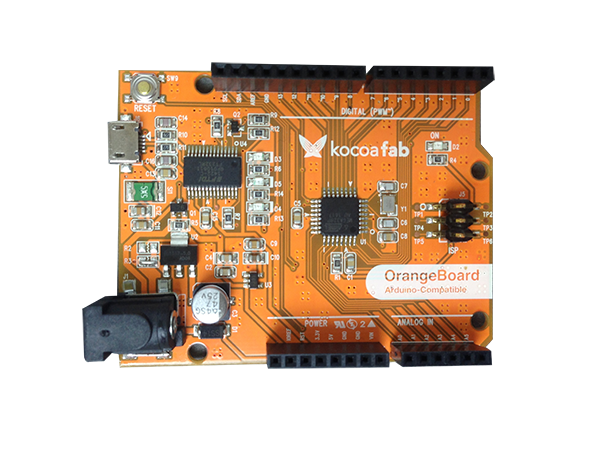 |
 |
 |
 |
| 부품명 | 10KΩ 저항 | 1KΩ 저항 | 330Ω 저항 | 브레드보드 | 점퍼케이블 |
| 파트 | 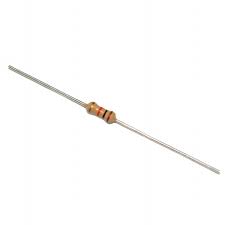 |
 |
 |
 |
 |
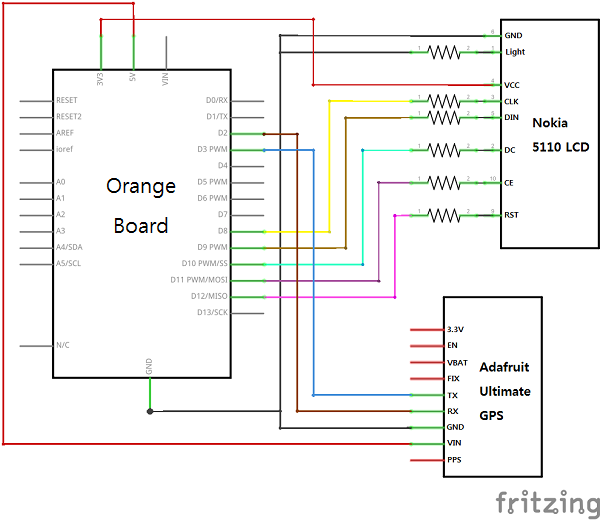

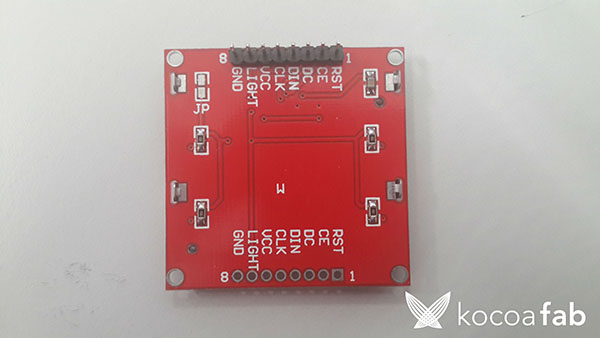
| Nokia 5110 | Arduino |
| GND | GND |
| LIGHT | GND(330Ω) |
| VCC | 3.3V |
| CLK | D8(10KΩ) |
| DIN | D9(10KΩ) |
| DC | D10(10KΩ) |
| CE | D11(10KΩ) |
| RST | D12(1KΩ) |
| GPS | Arduino |
| VIN | 5V |
| GND | GND |
| RX | D2 |
| TX | D3 |
* 안테나 연결시 오른쪽 밑의 빨간색 원에 꽂으시면 됩니다.
* GPS값을 받아 올려면 모듈이나 안테나가 실외에 있어야 합니다. 실내에서 하실 경우 GPS값을 받아오지 못하고, 시간도 정확하지 않습니다.
* 이 소스는 스케치를 이용하여 작성 / 업로드 합니다. 스케치에 대한 사용법은 링크를 참고하시기 바랍니다.
// Test code for Adafruit GPS modules using MTK3329/MTK3339 driver
//
// This code shows how to listen to the GPS module in an interrupt
// which allows the program to have more 'freedom' - just parse
// when a new NMEA sentence is available! Then access data when
// desired.
//
// Tested and works great with the Adafruit Ultimate GPS module
// using MTK33x9 chipset
//    ------> http://www.adafruit.com/products/746
// Pick one up today at the Adafruit electronics shop
// and help support open source hardware & software! -ada
#include
#include
#include

#define RST 12 //12번 핀에 RST를 연결합니다.
#define CE  11 //11번 핀에 CE를 연결합니다.
#define DC  10 //10번 핀에 DC를 연결합니다.
#define DIN  9 //9번 핀에 DIN을 연결합니다.
#define CLK  8 //8번 핀에 CLK를 연결합니다.

// If you're using a GPS module:
// Connect the GPS Power pin to 5V
// Connect the GPS Ground pin to ground
// If using software serial (sketch example default):
//   Connect the GPS TX (transmit) pin to Digital 3
//   Connect the GPS RX (receive) pin to Digital 2
// If using hardware serial (e.g. Arduino Mega):
//   Connect the GPS TX (transmit) pin to Arduino RX1, RX2 or RX3
//   Connect the GPS RX (receive) pin to matching TX1, TX2 or TX3

// If you're using the Adafruit GPS shield, change
// SoftwareSerial mySerial(3, 2); -> SoftwareSerial mySerial(8, 7);
// and make sure the switch is set to SoftSerial

// If using software serial, keep this line enabled
// (you can change the pin numbers to match your wiring):
SoftwareSerial mySerial(3, 2);

// If using hardware serial (e.g. Arduino Mega), comment out the
// above SoftwareSerial line, and enable this line instead
// (you can change the Serial number to match your wiring):

//HardwareSerial mySerial = Serial1;


Adafruit_GPS GPS(&mySerial);


// Set GPSECHO to 'false' to turn off echoing the GPS data to the Serial console
// Set to 'true' if you want to debug and listen to the raw GPS sentences.
#define GPSECHO  true

// this keeps track of whether we're using the interrupt
// off by default!
boolean usingInterrupt = false;
void useInterrupt(boolean); // Func prototype keeps Arduino 0023 happy

static const byte ASCII[][5] = // 아스키코드의 문자열을 나열합니다.
{
 {0x00, 0x00, 0x00, 0x00, 0x00} // 20
,{0x00, 0x00, 0x5f, 0x00, 0x00} // 21 !
,{0x00, 0x07, 0x00, 0x07, 0x00} // 22 "
,{0x14, 0x7f, 0x14, 0x7f, 0x14} // 23 #
,{0x24, 0x2a, 0x7f, 0x2a, 0x12} // 24 $
,{0x23, 0x13, 0x08, 0x64, 0x62} // 25 %
,{0x36, 0x49, 0x55, 0x22, 0x50} // 26 &
,{0x00, 0x05, 0x03, 0x00, 0x00} // 27 '
,{0x00, 0x1c, 0x22, 0x41, 0x00} // 28 (
,{0x00, 0x41, 0x22, 0x1c, 0x00} // 29 )
,{0x14, 0x08, 0x3e, 0x08, 0x14} // 2a *
,{0x08, 0x08, 0x3e, 0x08, 0x08} // 2b +
,{0x00, 0x50, 0x30, 0x00, 0x00} // 2c ,
,{0x08, 0x08, 0x08, 0x08, 0x08} // 2d -
,{0x00, 0x60, 0x60, 0x00, 0x00} // 2e .
,{0x20, 0x10, 0x08, 0x04, 0x02} // 2f /
,{0x3e, 0x51, 0x49, 0x45, 0x3e} // 30 0
,{0x00, 0x42, 0x7f, 0x40, 0x00} // 31 1
,{0x42, 0x61, 0x51, 0x49, 0x46} // 32 2
,{0x21, 0x41, 0x45, 0x4b, 0x31} // 33 3
,{0x18, 0x14, 0x12, 0x7f, 0x10} // 34 4
,{0x27, 0x45, 0x45, 0x45, 0x39} // 35 5
,{0x3c, 0x4a, 0x49, 0x49, 0x30} // 36 6
,{0x01, 0x71, 0x09, 0x05, 0x03} // 37 7
,{0x36, 0x49, 0x49, 0x49, 0x36} // 38 8
,{0x06, 0x49, 0x49, 0x29, 0x1e} // 39 9
,{0x00, 0x36, 0x36, 0x00, 0x00} // 3a :
,{0x00, 0x56, 0x36, 0x00, 0x00} // 3b ;
,{0x08, 0x14, 0x22, 0x41, 0x00} // 3c <
,{0x14, 0x14, 0x14, 0x14, 0x14} // 3d =
,{0x00, 0x41, 0x22, 0x14, 0x08} // 3e >
,{0x02, 0x01, 0x51, 0x09, 0x06} // 3f ?
,{0x32, 0x49, 0x79, 0x41, 0x3e} // 40 @
,{0x7e, 0x11, 0x11, 0x11, 0x7e} // 41 A
,{0x7f, 0x49, 0x49, 0x49, 0x36} // 42 B
,{0x3e, 0x41, 0x41, 0x41, 0x22} // 43 C
,{0x7f, 0x41, 0x41, 0x22, 0x1c} // 44 D
,{0x7f, 0x49, 0x49, 0x49, 0x41} // 45 E
,{0x7f, 0x09, 0x09, 0x09, 0x01} // 46 F
,{0x3e, 0x41, 0x49, 0x49, 0x7a} // 47 G
,{0x7f, 0x08, 0x08, 0x08, 0x7f} // 48 H
,{0x00, 0x41, 0x7f, 0x41, 0x00} // 49 I
,{0x20, 0x40, 0x41, 0x3f, 0x01} // 4a J
,{0x7f, 0x08, 0x14, 0x22, 0x41} // 4b K
,{0x7f, 0x40, 0x40, 0x40, 0x40} // 4c L
,{0x7f, 0x02, 0x0c, 0x02, 0x7f} // 4d M
,{0x7f, 0x04, 0x08, 0x10, 0x7f} // 4e N
,{0x3e, 0x41, 0x41, 0x41, 0x3e} // 4f O
,{0x7f, 0x09, 0x09, 0x09, 0x06} // 50 P
,{0x3e, 0x41, 0x51, 0x21, 0x5e} // 51 Q
,{0x7f, 0x09, 0x19, 0x29, 0x46} // 52 R
,{0x46, 0x49, 0x49, 0x49, 0x31} // 53 S
,{0x01, 0x01, 0x7f, 0x01, 0x01} // 54 T
,{0x3f, 0x40, 0x40, 0x40, 0x3f} // 55 U
,{0x1f, 0x20, 0x40, 0x20, 0x1f} // 56 V
,{0x3f, 0x40, 0x38, 0x40, 0x3f} // 57 W
,{0x63, 0x14, 0x08, 0x14, 0x63} // 58 X
,{0x07, 0x08, 0x70, 0x08, 0x07} // 59 Y
,{0x61, 0x51, 0x49, 0x45, 0x43} // 5a Z
,{0x00, 0x7f, 0x41, 0x41, 0x00} // 5b [
,{0x02, 0x04, 0x08, 0x10, 0x20} // 5c ¥
,{0x00, 0x41, 0x41, 0x7f, 0x00} // 5d ]
,{0x04, 0x02, 0x01, 0x02, 0x04} // 5e ^
,{0x40, 0x40, 0x40, 0x40, 0x40} // 5f _
,{0x00, 0x01, 0x02, 0x04, 0x00} // 60 `
,{0x20, 0x54, 0x54, 0x54, 0x78} // 61 a
,{0x7f, 0x48, 0x44, 0x44, 0x38} // 62 b
,{0x38, 0x44, 0x44, 0x44, 0x20} // 63 c
,{0x38, 0x44, 0x44, 0x48, 0x7f} // 64 d
,{0x38, 0x54, 0x54, 0x54, 0x18} // 65 e
,{0x08, 0x7e, 0x09, 0x01, 0x02} // 66 f
,{0x0c, 0x52, 0x52, 0x52, 0x3e} // 67 g
,{0x7f, 0x08, 0x04, 0x04, 0x78} // 68 h
,{0x00, 0x44, 0x7d, 0x40, 0x00} // 69 i
,{0x20, 0x40, 0x44, 0x3d, 0x00} // 6a j
,{0x7f, 0x10, 0x28, 0x44, 0x00} // 6b k
,{0x00, 0x41, 0x7f, 0x40, 0x00} // 6c l
,{0x7c, 0x04, 0x18, 0x04, 0x78} // 6d m
,{0x7c, 0x08, 0x04, 0x04, 0x78} // 6e n
,{0x38, 0x44, 0x44, 0x44, 0x38} // 6f o
,{0x7c, 0x14, 0x14, 0x14, 0x08} // 70 p
,{0x08, 0x14, 0x14, 0x18, 0x7c} // 71 q
,{0x7c, 0x08, 0x04, 0x04, 0x08} // 72 r
,{0x48, 0x54, 0x54, 0x54, 0x20} // 73 s
,{0x04, 0x3f, 0x44, 0x40, 0x20} // 74 t
,{0x3c, 0x40, 0x40, 0x20, 0x7c} // 75 u
,{0x1c, 0x20, 0x40, 0x20, 0x1c} // 76 v
,{0x3c, 0x40, 0x30, 0x40, 0x3c} // 77 w
,{0x44, 0x28, 0x10, 0x28, 0x44} // 78 x
,{0x0c, 0x50, 0x50, 0x50, 0x3c} // 79 y
,{0x44, 0x64, 0x54, 0x4c, 0x44} // 7a z
,{0x00, 0x08, 0x36, 0x41, 0x00} // 7b {
,{0x00, 0x00, 0x7f, 0x00, 0x00} // 7c |
,{0x00, 0x41, 0x36, 0x08, 0x00} // 7d }
,{0x10, 0x08, 0x08, 0x10, 0x08} // 7e ←
,{0x78, 0x46, 0x41, 0x46, 0x78} // 7f →
};

void LcdWriteString(char *characters)
{ // String값을 LCD에 출력하는 함수
  while(*characters) LcdWriteCharacter(*characters++);
}

void LcdWriteCharacter(char character)
{ // char값을 LCD에 출력하는 함수
  for(int i=0; i<5; i++) LcdWriteData(ASCII[character - 0x20][i]);
  LcdWriteData(0x00);
}

void LcdWriteData(byte dat)
{ // byte값을 LCD에 출력하는 함수
  digitalWrite(DC, HIGH);
  digitalWrite(CE, LOW);
  shiftOut(DIN, CLK, MSBFIRST, dat); // 시리얼 데이터를 LCD에 전송합니다.
  digitalWrite(CE, HIGH);
}

void LcdXY(int x, int y)
{ // LCD의 X, Y좌표값을 설정해 주는 함수
  LcdWriteCmd(0x80 | x);  // 커서의 가로위치를 지정합니다.
  LcdWriteCmd(0x40 | y);  // 커서의 세로위치를 지정합니다.
}

void LcdWriteCmd(byte cmd)
{
  digitalWrite(DC, LOW); //커맨드 입력을 위해 LOW로 설정합니다.
  digitalWrite(CE, LOW);
  shiftOut(DIN, CLK, MSBFIRST, cmd); //시리얼 데이터를 LCD에 전송합니다.

  digitalWrite(CE, HIGH);
}

void setup()
{
  // connect at 115200 so we can read the GPS fast enough and echo without dropping chars
  // also spit it out
  Serial.begin(115200);
  Serial.println("Adafruit GPS library basic test!");

  // 9600 NMEA is the default baud rate for Adafruit MTK GPS's- some use 4800
  GPS.begin(9600);

  // uncomment this line to turn on RMC (recommended minimum) and GGA (fix data) including altitude
  GPS.sendCommand(PMTK_SET_NMEA_OUTPUT_RMCGGA);
  // uncomment this line to turn on only the "minimum recommended" data
  //GPS.sendCommand(PMTK_SET_NMEA_OUTPUT_RMCONLY);
  // For parsing data, we don't suggest using anything but either RMC only or RMC+GGA since
  // the parser doesn't care about other sentences at this time

  // Set the update rate
  GPS.sendCommand(PMTK_SET_NMEA_UPDATE_1HZ);   // 1 Hz update rate
  // For the parsing code to work nicely and have time to sort thru the data, and
  // print it out we don't suggest using anything higher than 1 Hz

  // Request updates on antenna status, comment out to keep quiet
  GPS.sendCommand(PGCMD_ANTENNA);

  // the nice thing about this code is you can have a timer0 interrupt go off
  // every 1 millisecond, and read data from the GPS for you. that makes the
  // loop code a heck of a lot easier!
  useInterrupt(true);

  pinMode(RST, OUTPUT);
  pinMode(CE, OUTPUT);
  pinMode(DC, OUTPUT);
  pinMode(DIN, OUTPUT);
  pinMode(CLK, OUTPUT);
  digitalWrite(RST, LOW);
  digitalWrite(RST, HIGH);
  // LCD와 연결된 각 핀을 설정합니다.


  LcdWriteCmd(0x21);  // LCD 확장 명령
  LcdWriteCmd(0xBF);  // LCD의 콘트라스트(명암을 결정합니다)
  LcdWriteCmd(0x04);
  LcdWriteCmd(0x14);
  LcdWriteCmd(0x20);
  LcdWriteCmd(0x0C);

  for(int i=0; i<504; i++) LcdWriteData(0x00); //LCD를 초기화 합니다

  LcdXY(20, 2);
  LcdWriteString("KOCOA FAB");
  // 시작시 화면 가운데에 KOCOA FAB 글자를 띄워줍니다.

  delay(1000);
  // Ask for firmware version

  mySerial.println(PMTK_Q_RELEASE);
}


// Interrupt is called once a millisecond, looks for any new GPS data, and stores it
SIGNAL(TIMER0_COMPA_vect) {
  char c = GPS.read();
  // if you want to debug, this is a good time to do it!
#ifdef UDR0
  if (GPSECHO)
    if (c) UDR0 = c;
    // writing direct to UDR0 is much much faster than Serial.print
    // but only one character can be written at a time.
#endif
}

void useInterrupt(boolean v) {
  if (v) {
    // Timer0 is already used for millis() - we'll just interrupt somewhere
    // in the middle and call the "Compare A" function above
    OCR0A = 0xAF;
    TIMSK0 |= _BV(OCIE0A);
    usingInterrupt = true;
  } else {
    // do not call the interrupt function COMPA anymore
    TIMSK0 &= ~_BV(OCIE0A);
    usingInterrupt = false;
  }
}

uint32_t timer = millis();
void loop()                     // run over and over again
{
  // in case you are not using the interrupt above, you'll
  // need to 'hand query' the GPS, not suggested :(
  if (! usingInterrupt) {
    // read data from the GPS in the 'main loop'
    char c = GPS.read();
    // if you want to debug, this is a good time to do it!
    if (GPSECHO)
      if (c) Serial.print(c);
  }

  // if a sentence is received, we can check the checksum, parse it...
  if (GPS.newNMEAreceived()) {
    // a tricky thing here is if we print the NMEA sentence, or data
    // we end up not listening and catching other sentences!
    // so be very wary if using OUTPUT_ALLDATA and trytng to print out data
    //Serial.println(GPS.lastNMEA());   // this also sets the newNMEAreceived() flag to false

    if (!GPS.parse(GPS.lastNMEA()))   // this also sets the newNMEAreceived() flag to false
      return;  // we can fail to parse a sentence in which case we should just wait for another
  }

  // if millis() or timer wraps around, we'll just reset it
  if (timer > millis())  timer = millis();

  // approximately every 2 seconds or so, print out the current stats
  if (millis() - timer > 2000) {
    timer = millis(); // reset the timer

    String hour = String(GPS.hour+9);
    // 현재 사용하는 라이브러리가 GMT표준시간을 출력합니다.
    // 우리나라는 GMT표준시간보다 9시간 빠르므로 9시간 더해주면 됩니다.
    // 추가로 출력시 24시가 넘어가면 24시 이상값이 나오므로 맞게 편집해 주셔야 합니다.
    String minu = String(GPS.minute);
    String sec = String(GPS.seconds);

    String time = hour + ":" + minu + ":" + sec;
    char *fTime = new char[time.length() + 1];
    strcpy(fTime, time.c_str());
    // 시분초를 HH:MM:SS형태로 바꿔주고, String값을 char*로 바꿔주어 LCD에 출력할 수 있도록 합니다.

    for(int i=0; i<504; i++) LcdWriteData(0x00); //LCD를 초기화 합니다

    LcdXY(0,2);
    LcdWriteString(fTime);
    delete [] fTime;
    // 시분초를 LCD에 출력해 줍니다.

    String day = String(GPS.day);
    String month = String(GPS.month);
    String year = String(GPS.year);

    String date = "20" + year + "/" + month + "/" + day;
    char *fDate = new char[date.length() + 1];
    strcpy(fDate, date.c_str());
    // 년월일를 YY/MM/DD형태로 바꿔주고, String값을 char*로 바꿔주어 LCD에 출력할 수 있도록 합니다.


    LcdXY(0,1);
    LcdWriteString(fDate);
    delete [] fDate;
    // 년월일을 LCD에 출력해 줍니다.


    if (GPS.fix) {
      char lat[20];
      char loc[20];
      dtostrf(GPS.latitude, 9, 4, lat);
      dtostrf(GPS.longitude, 9, 4, loc);
      // dtostrf는 GPS.latitude와 GPS.longitude의 값(float값)을 Char* 로 바꿔줍니다.

      lat[4] = lat[3];
      lat[3] = lat[2];
      lat[2] = '.';

      loc[5] = loc[4];
      loc[4] = loc[3];
      loc[3] = '.';
      // GPS.latitude와 GPS.longitude값을 받아오면 소숫점 자리가 4번째 자리에 찍혀 있습니다.
      // latitude = 3728,8640, longitude = 12700.8960
      // 이것을 소수점 두번째 자리에 찍는 작업입니다.


      LcdXY(0,3);
      LcdWriteString(lat);
      LcdXY(0,4);
      LcdWriteString(loc);
      // latitude값과 longitude값을 LCD에 출력합니다.
    }
  }
}

// 출처 : Adafruit_GPS 예제 parsing을 사용하였으며, 필요에 맞게 KocoaFab에서 수정하였습니다.
위의 소스를 사용하기 위해서는 Adafruit_GPS.h라이브러리가 추가로 필요합니다.
(라이브러리 사용법은 링크를 참고하시기 바랍니다.)
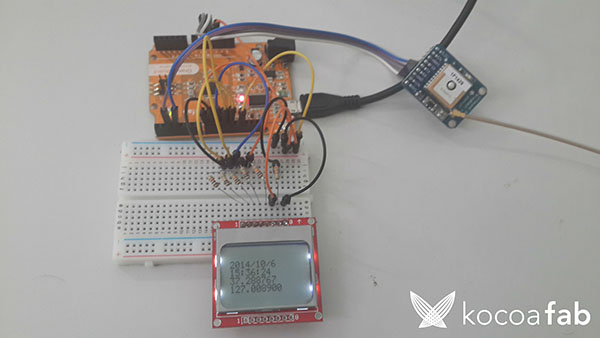
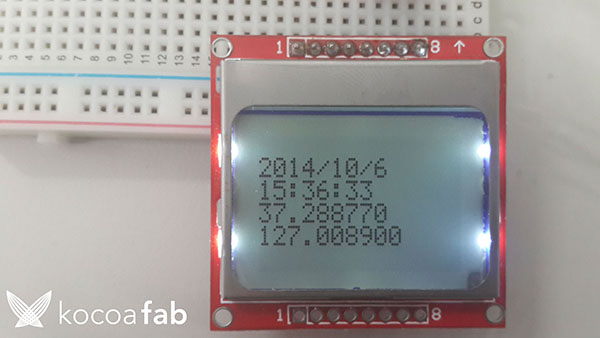
GPS를 사용하여 값을 LCD에 출력하는 예제입니다. Adafruit_GPS라이브러리에 있는 parsing예제를 사용하면 시리얼 모니터에 날짜, 시간, GPS값, 속도 등 여러가지 값을 확인할 수 있습니다. 여기서 날짜, 시간, GPS값을 가져와서 Nokia 5110 LCD를 이용하여 화면에 출력해 봅시다.
  for(int i=0; i<504; i++) LcdWriteData(0x00); //LCD를 초기화 합니다

  LcdXY(20, 2);
  LcdWriteString("KOCOA FAB");
  // 시작시 화면 가운데에 KOCOA FAB 글자를 띄워줍니다.
LCD를 키게 되면 화면을 클리어 한 후 화면 중앙부근에 KOCOA FAB이란 글자를 띄워줍니다.
    String hour = String(GPS.hour+9);
    // 현재 사용하는 라이브러리가 GMT표준시간을 출력합니다.
    // 우리나라는 GMT표준시간보다 9시간 빠르므로 9시간 더해주면 됩니다.
    // 추가로 출력시 24시가 넘어가면 24시 이상값이 나오므로 맞게 편집해 주셔야 합니다.
    String minu = String(GPS.minute);
    String sec = String(GPS.seconds);

    String time = hour + ":" + minu + ":" + sec;
    char *fTime = new char[time.length() + 1];
    strcpy(fTime, time.c_str());
    // 시분초를 HH:MM:SS형태로 바꿔주고, String값을 char*로 바꿔주어 LCD에 출력할 수 있도록 합니다.

    for(int i=0; i<504; i++) LcdWriteData(0x00); //LCD를 초기화 합니다

    LcdXY(0,2);
    LcdWriteString(fTime);
    delete [] fTime;
    // 시분초를 LCD에 출력해 줍니다.
GPS에서 받아온 시분초 값을 이용하여 LCD에 출력하는 부분입니다. GPS.hour, GPS.minute, GPS.second를 이용하여 현재 시분초 값을 받아옵니다.
(* GPS에서 받아오는 시간값은 GMT(Greenwich Mean Time)표준시간 입니다. 우리나라는 GMT표준시간보다 9시간 빠르므로 받아오는 시간값에 9시간을 더해주면 됩니다.)
(위에서는 그냥 받아오는 시간값에 9시간을 더했지만, 이럴경우 24시간이 넘어가면(15시 이후) 25, 26시... 로 넘어가게 됩니다. 정확한 시간을 출력하고 싶으시면 if문을 사용하여 24시 이후로 넘어가면 0시로 바뀌게 해주시면 됩니다.)
GPS.hour, GPS.minute, GPS.second 를 이용하여 받아오는 값은 int값입니다. int값을 String으로 바꿔 준 뒤, HH:MM:SS로 출력되게 문자들을 합쳐 줍니다.
String값을 char*값으로 바꿔 준 뒤 LCD에 출력해 줍니다.
    String day = String(GPS.day);
    String month = String(GPS.month);
    String year = String(GPS.year);

    String date = "20" + year + "/" + month + "/" + day;
    char *fDate = new char[date.length() + 1];
    strcpy(fDate, date.c_str());
    // 년월일를 YY/MM/DD형태로 바꿔주고, String값을 char*로 바꿔주어 LCD에 출력할 수 있도록 합니다.


    LcdXY(0,1);
    LcdWriteString(fDate);
    delete [] fDate;
    // 년월일을 LCD에 출력해 줍니다.
년월일을 LCD에 출력하는 부분입니다. GPS.day, GPS.month, GPS.year를 이용하여 현재 년월일을 받아옵니다.
(GPS.year에서 받아오는 값은 년도에서 뒤에 2자리(ex:2014년에서 14)만 받아옵니다. 제대로 2014를 출력하기 위해서는 앞에 20을 출력해야 합니다.)
GPS.day, GPS.month, GPS.year를 이용하여 받아오는 값은 int값입니다. int값을 String으로 바꿔 준 뒤, 20YY/MM/DD로 출력되게 문자들을 합쳐 줍니다.
String값을 char*값으로 바꿔 준 뒤 LCD에 출력해 줍니다.
    if (GPS.fix) {
      char lat[20];
      char loc[20];
      dtostrf(GPS.latitude, 9, 4, lat);
      dtostrf(GPS.longitude, 9, 4, loc);
      // dtostrf는 GPS.latitude와 GPS.longitude의 값(float값)을 Char* 로 바꿔줍니다.

      lat[4] = lat[3];
      lat[3] = lat[2];
      lat[2] = '.';

      loc[5] = loc[4];
      loc[4] = loc[3];
      loc[3] = '.';
      // GPS.latitude와 GPS.longitude값을 받아오면 소숫점 자리가 4번째 자리에 찍혀 있습니다.
      // latitude = 3728,8640, longitude = 12700.8960
      // 이것을 소수점 두번째 자리에 찍는 작업입니다.


      LcdXY(0,3);
      LcdWriteString(lat);
      LcdXY(0,4);
      LcdWriteString(loc);
      // latitude값과 longitude값을 LCD에 출력합니다.
    }
GPS latitude, longitude값을 LCD에 출력하는 부분입니다. 위에 시간이나 년월일과는 다르게 받아오는 값이 float값이므로 char*으로 바꿔주기 위해 dtostrf()함수를 사용했습니다.
(LCD에서 float값을 출력할 수 없습니다.)
(dtostrf함수 안에는 (변경할 float값, 최소 길이, 변경될 소수점 자리, 변경된 값을 저장할 변수) 가 들어 갑니다.
dtostrf(GPS.latitude, 9, 4, lat)를 사용하게 되면 GPS.latitude float값이 char*로 lat에 들어가게 됩니다.(longitude도 같습니다.)
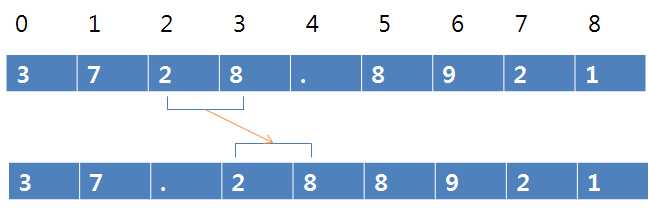
GPS.latitude와 GPS.longitude는 4번째 자리에서 소숫점을 찍기 때문에 이것을 2번째 자리로 옮겨야 합니다.
(GPS.latitude를 사용하면 값이 3728.8840이 나옵니다. 이것을 37.288840으로 바꿔줘야 합니다.)
dtostrf()함수를 사용해서 char*에 값이 들어가 있으므로, 소숫점을 찍을 3번째 자리(char[2])부터 한칸씩 뒤로 밀어 줍니다.(소숫점이 찍혀있는 5번째 자리까지(char[4]))
그 후 3번째 자리에(char[2]) 소숫점을 찍어주면 char*에 있는 값이 정확하게 두번째 자리 뒤에 소숫점이 찍히게 됩니다.(밑의 그림 참조)

kocoafabeditor 
항상 진취적이고, 새로운 것을 추구하는 코코아팹 에디터입니다!
 GPS, 아두이노, 오렌지보드


