
날씨 정보를 알려 주는 구름 조명 만들기
2015-04-22 11:01:16
요즘은 led를 이용한 다양한 모양의 조명을 찾아 볼 수 있습니다.
그 중 가장 인상 깊었던 것은 led 주변에 솜을 붙여 만든 구름 모양 조명인데요.
솜의 양감과 led의 은은한 빛이 어우러져 좋은 시각적 효과를 만들어 내는 것 같습니다.
또한 자연물이 인공적인 공간에 존재하는 이질적인 느낌 또한 신선함을 주는 것 같습니다.
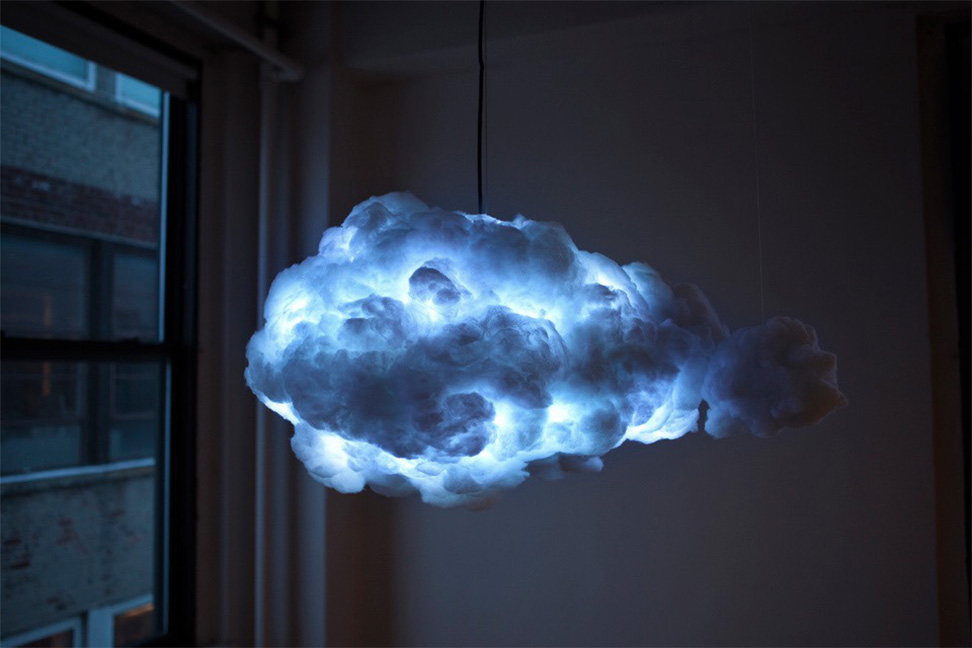
사진 출처 : http://www.gizmag.com/cloud-thunder-lightning-home/32874/
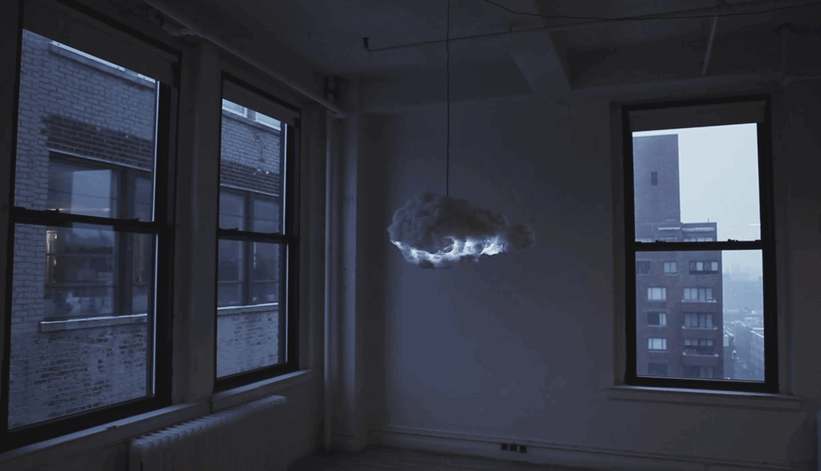
사진 출처 : http://www.feeldesain.com/the-stormy-cloud-light-richard-clarkson.html
구름은 날씨와도 만은 관련이 있는 개체이죠~ 그래서 이번 프로젝트는 웹에서 날씨 데이터를 받아와 led의 색으로 날씨를 알려주는 조명을 만들어보았습니다!
개요
와이파이 쉴드와 30mm 대형 RGB led, strip led를 이용해 날씨 정보를 표현하는 구름 조명을 만들어 봅시다.
- 와이파이 쉴드와 open weather api를 이용해 날씨 정보를 파싱.
- adafruit neopixel 라이브러리를 이용해 led 제어.
시작전 개념 이해하기
kocoa fab에서 제공하는 2개의 튜토리얼을 조합해서 만든 것이기 때문에 쉽게 따라할 수 있습니다.
- wifi 쉴드를 이용하여 API를 통해 인터넷에서 날씨 정보 읽어오기
부품 목록
| NO | 부품명 | 수량 | 상세설명 |
| 1 | 아두이노 | 1 | 오렌지 보드 |
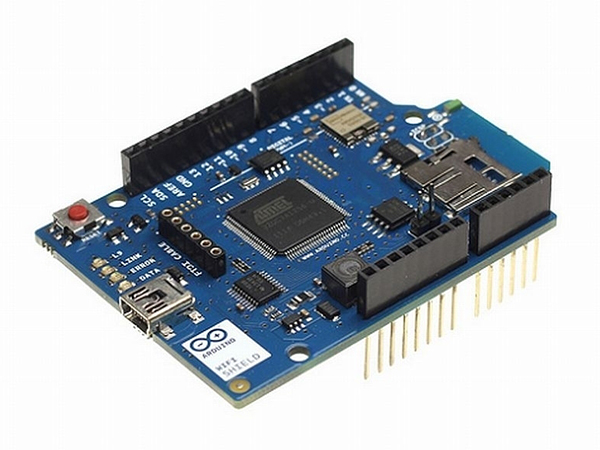
| 2 | WiFi 쉴드 | 1 | Wifi 모듈 |
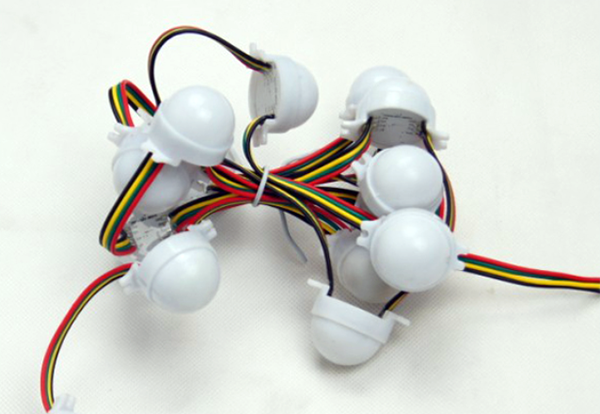
| 3 | 30mm 대형 RGB| LED Strip | 1 | ws2801(adafruit) |
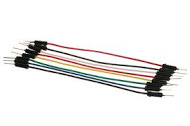
| 4 | 점퍼케이블 | 10 | 점퍼케이블 |
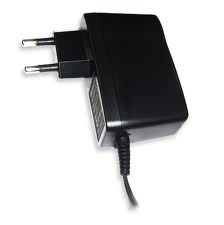
| 5 | 아답터 | 1 | DC 9V |
|
부품명 |
아두이노 | 30mm 대형 RGB| LED Strip | 아두이노 WiFi 쉴드 | 점퍼케이블 | 아답터 |
| 부품 사진 | 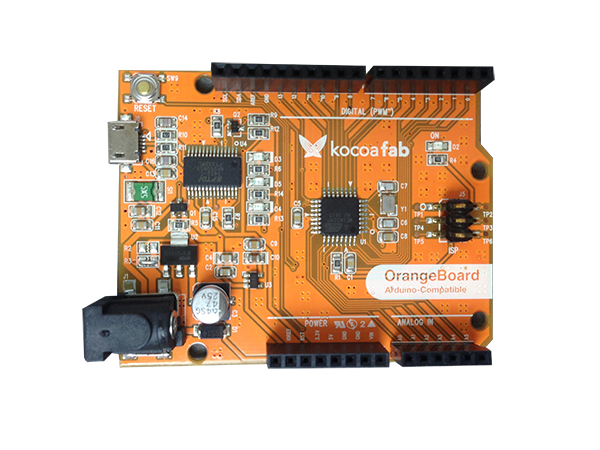 |
 |
 |
 |
 |
제작 과정
사전에 부품들이 잘 작동되는지 확인하는 것은 필수겠죠?
다 만들고 led 불이 안들어 온다거나 하는 상황이 오면 매우 난감합니다.
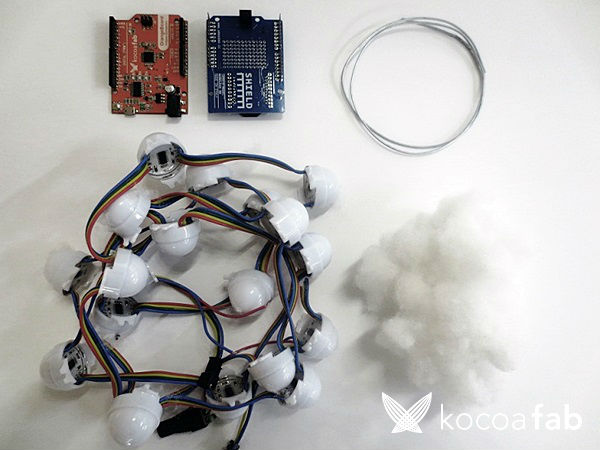
1. 만들기 전 제작에 필요한 부품들을 준비합니다.(오렌지보드, 와이파이 쉴드, 철사, 점퍼케이블, 30mm 대형 RGB led, 솜
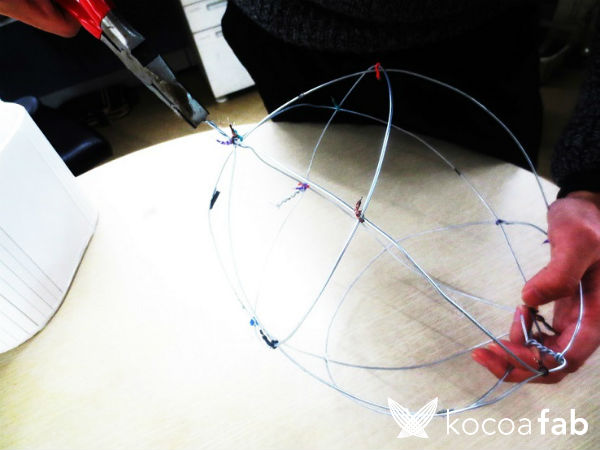
2. 철사를 이용해 led를 고정시키기 위한 틀을 제작합니다.
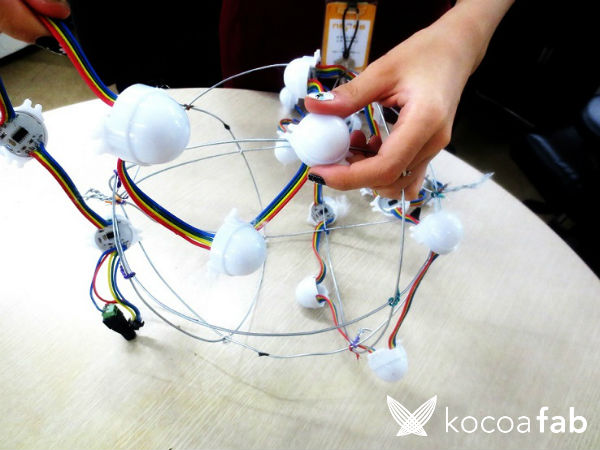
3. led를 철사로 만든 틀에 골고루 엮어줍니다.
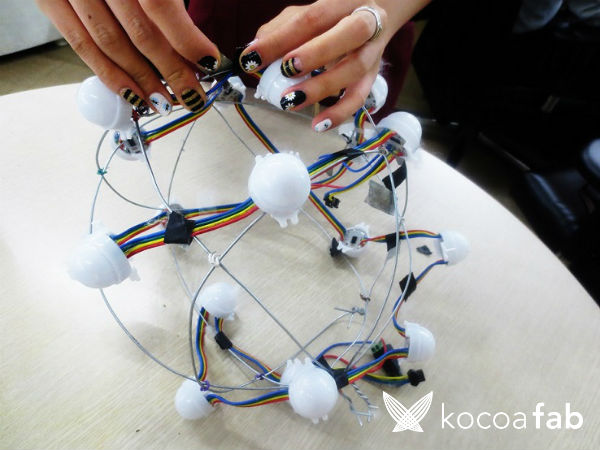
4. led가 떨어지지 않게 테이트를 이용하여 틀에 단단히 고정시켜 줍니다.

5. 자연스럽게 구름 모양을 잡아가면서, 솜을 붙입니다.
tip ) 틀에 바로 솜을 붙이면 표면적이 작아 잘 붙지 않으니, 한지나 비닐로 틀 위를 덮은 후, 붙이면 붙이기가 훨씬 수월합니다.

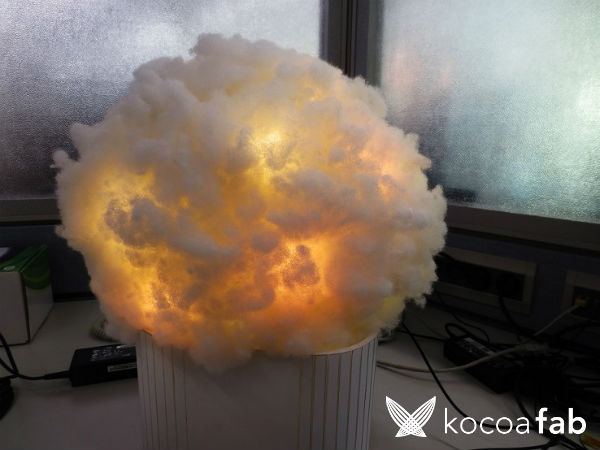
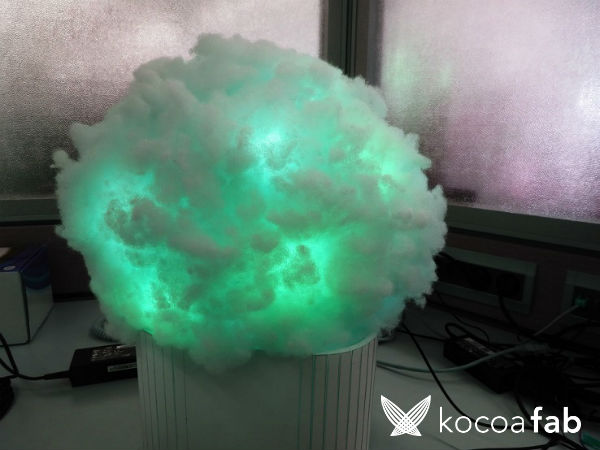
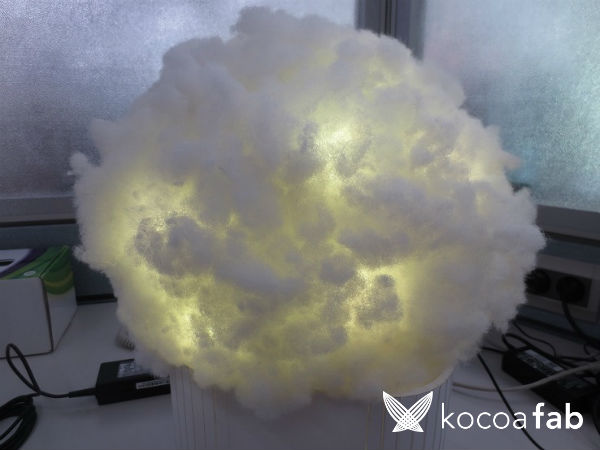
완성된 모습니다. 어떠신가요?~ 솜으로 사이로 세어나오는 빛이 굉장히 아름답죠?
솜의 재질과 부피에 따라서 느낌이 달라지는 것 같습니다.


구름 조명 미니 버젼
큰 것이 너무 부담스러우신 분들은 led를 조금만 사용하여, 작게 만들어 사용하셔도 좋습니다.
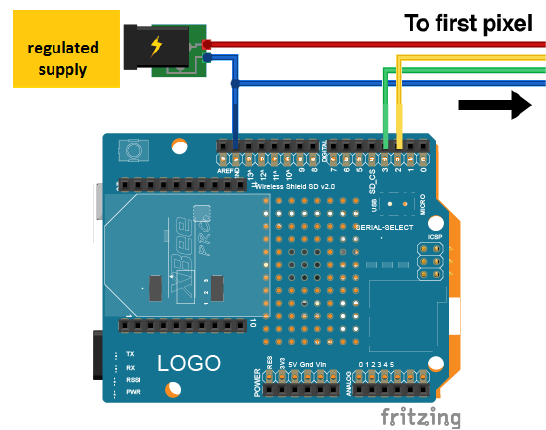
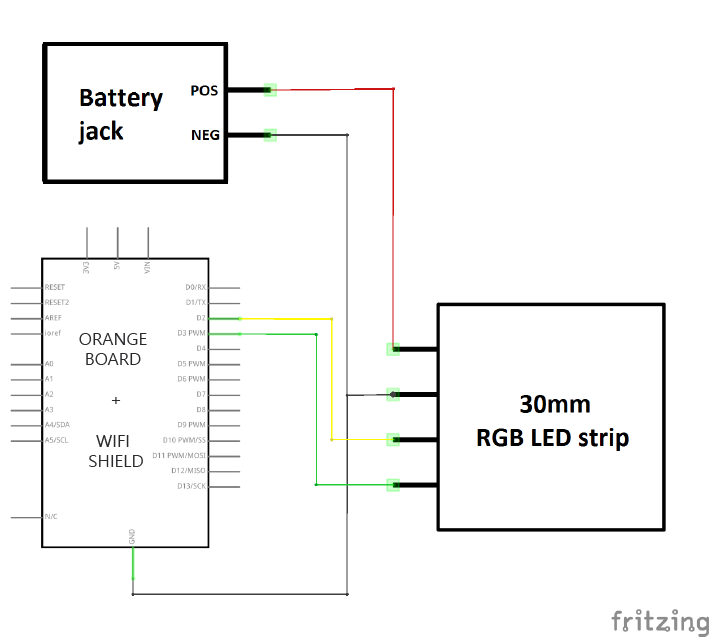
하드웨어 making
브래드 보드
전자 회로도
소프트웨어 coding
다음링크를 통해 ino 파일을 다운로드 받으세요
#include "SPI.h"
#include "WiFi.h"
#include "Adafruit_WS2801.h"
#ifdef __AVR_ATtiny85__
#include
#endif
char ssid[] = "Wifi SSID"; //와이파이 SSID
char pass[] = "와이파이 비밀번호"; //와이파이 password
//인스턴스 변수 초기화
WiFiServer server(80);
WiFiClient client;
const unsigned long requestInterval = 60000; // 요구 시간 딜레이(1 min)
IPAddress hostIp;
uint8_t ret;
unsigned long lastAttemptTime = 0; // 마지막으로 서버에서 데이터를 전송받은 시간
String currentLine = "";
String weatherString = "";
String timeString = "";
String location = "kiev";
boolean readingWeather = false;
boolean readingTime = false;
boolean stringComplete = false;
int weather;
int temp = 0;
uint8_t dataPin = 2; // Yellow wire on Adafruit Pixels
uint8_t clockPin = 3; // Green wire on Adafruit Pixels
int lednum = 30;
Adafruit_WS2801 strip = Adafruit_WS2801(25, dataPin, clockPin);
void setup() {
//각 변수에 정해진 공간 할당
Serial.begin(115200);
#if defined(__AVR_ATtiny85__) && (F_CPU == 16000000L)
clock_prescale_set(clock_div_1); //clock을 16Mhz로 사용
#endif
strip.begin();
strip.show();
delay(10);
//WiFi연결 시도
Serial.println("Connecting to WiFi....");
WiFi.begin(ssid, pass); //WiFi가 패스워드를 사용한다면 매개변수에 password도 작성
server.begin();
Serial.println("Connect success!");
Serial.println("Waiting for DHCP address");
//DHCP주소를 기다린다
while(WiFi.localIP() == INADDR_NONE) {
Serial.print(".");
delay(300);
}
Serial.println("\n");
printWifiData();
connectToServer();
}
void loop()
{
if (client.connected()) {
while (client.available()) {
//전송된 데이터가 있을 경우 데이터를 읽어들인다.
char inChar = client.read();
// 읽어온 데이터를 inChar에 저장한다.
currentLine += inChar;
//inChar에 저장된 Char변수는 currentLine이라는 String변수에 쌓이게 된다.
//라인피드(줄바꿈)문자열이 전송되면 데이터를 보내지 않는다.
if (inChar == '\n') {
//Serial.print("clientReadLine = ");
//Serial.println(currentLine);
currentLine = "";
}
if ( currentLine.endsWith(" readingWeather = true;
weatherString = " "; }
if (readingWeather) {
if (inChar != 'v') { //다음 전송될 문자가 'v'가 아니라면 계속 날씨 데이터(코드)를 받는다.
weatherString += inChar;
}
else { //다음 전송된 문자가 'v'라면 날씨 데이터(코드)를 출력한다.
readingWeather = false;
weather = getInt(weatherString);
weatherpixel();
Serial.print("weather code: ");
Serial.println(weather);
}
}
if ( currentLine.endsWith(" }
if (readingTime) {
if (inChar != '/') { //다음 전송될 문자가 '/'가 아니라면 계속적으로 시간데이터를 받는다
timeString += inChar;
}
else {
readingTime = false;
Serial.print("last update: ");
Serial.println(timeString.substring(2,timeString.length()-1));
}
}
if ( currentLine.endsWith("")) { //현재 스트링이 로 끝났다면 연결을 끊고 다시 서버와 연결을 준비한다.
delay(100); //10초뒤에 서버와 연결을 끊고 재연결을 시도한다.
client.stop();
// serialEvent();
// if (stringComplete) {
// Serial.println(location);
// // clear the string:
// stringComplete = false;
// }
connectToServer();
//Serial.println("Disconnected from Server.\n");
}
}
}
else if (millis() - lastAttemptTime > requestInterval) {
//연결을 실패했다면 requestInterval(60초)이후에 다시 연결을 시도한다.
connectToServer();
}
}
//서버와 연결
void connectToServer() {
Serial.println("");
Serial.println("connecting to server...");
String content = "";
if (client.connect(hostIp, 80)) {
Serial.println("Connected! Making HTTP request to api.openweathermap.org for "+location+"...");
//Serial.println("GET /data/2.5/weather?q="+location+"&mode=xml");
client.println("GET /data/2.5/weather?q="+location+"&mode=xml");
//위에 지정된 주소와 연결한다.
client.print("HOST: api.openweathermap.org\n");
client.println("User-Agent: launchpad-wifi");
client.println("Connection: close");
client.println();
Serial.println("Weather information for "+location);
}
//마지막으로 연결에 성공한 시간을 기록
lastAttemptTime = millis();
}
void printHex(int num, int precision) {
char tmp[16];
char format[128];
sprintf(format, "%%.%dX", precision);
sprintf(tmp, format, num);
Serial.print(tmp);
}
void printWifiData() {
// Wifi쉴드의 IP주소를 출력
Serial.println();
Serial.println("IP Address Information:");
IPAddress ip = WiFi.localIP();
Serial.print("IP Address: ");
Serial.println(ip);
//MAC address출력
byte mac[6];
WiFi.macAddress(mac);
Serial.print("MAC address: ");
printHex(mac[5], 2);
Serial.print(":");
printHex(mac[4], 2);
Serial.print(":");
printHex(mac[3], 2);
Serial.print(":");
printHex(mac[2], 2);
Serial.print(":");
printHex(mac[1], 2);
Serial.print(":");
printHex(mac[0], 2);
Serial.println();
//서브넷 마스크 출력
IPAddress subnet = WiFi.subnetMask();
Serial.print("NetMask: ");
Serial.println(subnet);
//게이트웨이 주소 출력
IPAddress gateway = WiFi.gatewayIP();
Serial.print("Gateway: ");
Serial.println(gateway);
Serial.print("SSID: ");
Serial.println(WiFi.SSID());
ret = WiFi.hostByName("api.openweathermap.org", hostIp);
Serial.print("ret: ");
Serial.println(ret);
Serial.print("Host IP: ");
Serial.println(hostIp);
Serial.println("");
}
int getInt(String input){ //String데이터를 intger형으로 변환하는 함수
int i = 2;
while(input[i] != '"'){
i++;
}
input = input.substring(2,i);
char carray[20];
//Serial.println(input);
input.toCharArray(carray, sizeof(carray));
//Serial.println(carray);
temp = atoi(carray);
//Serial.println(temp);
return temp;
}
void weatherpixel(){
float rantime = random(20,50);
//날씨 코드가 200부터 531까지 범위 안에 있다면 type3 패턴으로 led를 제어한다.
//비, 눈, 우박
if(weather>199 && weather<532){
type3();
}
else ;
//날씨 코드가 701부터 781, 또는 802부터 804까지 범위 안에 있다면 type2 패턴으로 led를 제어한다.
//흐림
if(weather>700 && weather <782){
type2();
}
else ;
if(weather>801 && weather<805){
type2();
}
else ;
//날씨 코드가 800부터 801
//흐림
if(weather>799 && weather<802){
type1();
}
else ;
}
void type1(){
rainbow(60);
}
void type2(){
uint16_t i, j;
for(j=0; j<256; j+=1) {
for(i=0; i int sum = i+j;
map(sum,0,300,120,190);
strip.setPixelColor(i, Wheel(sum),Wheel(sum),Wheel(sum));
}
strip.show();
delay(10);
}
}
void type3(){
uint16_t i, j,q;
for(q=0; q for(j=0; j<256; j+=1) {
for(i=0; i int sum = i+j;
map(sum,0,300,120,190);
strip.setPixelColor(i, Wheel(sum),Wheel(sum),0);
}
strip.show();
delay(10);
}
}
theaterChase(strip.Color(255, 255, 0), 60); //흰색 출력
}
//모든 LED를 출력가능한 모든색으로 한번씩 보여주는 동작을 한번하는 함수
void rainbow(uint8_t wait) {
uint16_t i, j;
for(j=0; j<256; j++) {
for(i=0; i strip.setPixelColor(i, Wheel((i+j) & 255));
}
strip.show();
delay(wait);
}
}
//입력한 색으로 LED를 깜빡거리며 표현한다void theaterChase(uint32_t c, uint8_t wait) {
for (int j=0; j<10; j++) {
for (int q=0; q < 3; q++) {
for (int i=0; i < strip.numPixels(); i=i+3) {
strip.setPixelColor(i+q, c);
}
strip.show();
delay(wait);
for (int i=0; i < strip.numPixels(); i=i+3) {
strip.setPixelColor(i+q, 0);
}
}
}
}
uint32_t Color(byte r, byte g, byte b)
{
uint32_t c;
c = r;
c <<= 8;
c |= g;
c <<= 8;
c |= b;
return c;
}
//255가지의 색을 나타내는 함수
uint32_t Wheel(byte WheelPos)
{
if (WheelPos < 85) {
return Color(WheelPos * 3, 255 - WheelPos * 3, 0);
} else if (WheelPos < 170) {
WheelPos -= 85;
return Color(255 - WheelPos * 3, 0, WheelPos * 3);
} else {
WheelPos -= 170;
return Color(0, WheelPos * 3, 255 - WheelPos * 3);
}
}
날씨 데이터를 가져 오는 부분.
if ( currentLine.endsWith(" readingWeather = true;
weatherString = " "; }
if (readingWeather) {
if (inChar != 'v') { //다음 전송될 문자가 'v'가 아니라면 계속 날씨 데이터(코드)를 받는다.
weatherString += inChar;
}
else { //다음 전송된 문자가 'v'라면 날씨 데이터(코드)를 출력한다.
readingWeather = false;
weather = getInt(weatherString);
weatherpixel();
Serial.print("weather code: ");
Serial.println(weather);
}
}
open weather map API에서 제공하는 데이터 중 날씨 코드만을 추출하는 데이터입니다.
데이터 파싱의 원리는 날씨데이터 가져오기 튜토리얼을 참고하세요.
날씨를 분류하는 부분
open weather map 홈페이지에 들어가보시면, 날씨 상태에 따라 코드 번호가 정해져 있음을 확인할 수 있습니다.
이 많은 코드 번호들을 범주에 맞게 분류해야 합니다. 범주는 아래와 같습니다.
날씨 코드 번호 목록 : http://www.openweathermap.org/weather-conditions
- 맑음
- 흐림
- 눈, 비, 우박
void weatherpixel(){
float rantime = random(20,50);
//날씨 코드가 200부터 531까지 범위 안에 있다면 type3 패턴으로 led를 제어한다.
//비, 눈, 우박
if(weather>199 && weather<532){
type3();
}
else ;
//날씨 코드가 701부터 781, 또는 802부터 804까지 범위 안에 있다면 type2 패턴으로 led를 제어한다.
//흐림
if(weather>700 && weather <782){
type2();
}
else ;
if(weather>801 && weather<805){
type2();
}
else ;
//날씨 코드가 800부터 801
//흐림
if(weather>799 && weather<802){
type1();
}
else ;
}
led를 제어하는 부분
led 제어는 adatruit에서 제공하는 라이브러리를 사용하였습니다.
void type1(){
rainbow(15);
}
void type2(){
// 하얀색 불빛이 서서히 켜지고, 꺼진다.
uint16_t i, j;
for(j=0; j<256; j+=1) {
for(i=0; i int sum = i+j;
map(sum,0,300,120,190);
strip.setPixelColor(i, Wheel(sum),Wheel(sum),Wheel(sum));
}
strip.show();
delay(10);
}
}
void type3(){
//노란색 불빛이 서서히 켜지고, 꺼짐을 1회에서 4회 정도 무작위 반복한 후 깜빡인다.
uint16_t i, j,q;
for(q=0; q for(j=0; j<256; j+=1) {
for(i=0; i int sum = i+j;
map(sum,0,300,120,190);
strip.setPixelColor(i, Wheel(sum),Wheel(sum),0);
}
strip.show();
delay(10);
}
}
theaterChase(strip.Color(255, 255, 0), 60); //흰색 출력
}
//모든 LED를 출력가능한 모든색으로 한번씩 보여주는 동작을 한번하는 함수
void rainbow(uint8_t wait) {
uint16_t i, j;
for(j=0; j<256; j++) {
for(i=0; i strip.setPixelColor(i, Wheel((i+j) & 255));
}
strip.show();
delay(wait);
}
}
//입력한 색으로 LED를 깜빡거리며 표현한다
void theaterChase(uint32_t c, uint8_t wait) {
for (int j=0; j<10; j++) {
for (int q=0; q < 3; q++) {
for (int i=0; i < strip.numPixels(); i=i+3) {
strip.setPixelColor(i+q, c);
}
strip.show();
delay(wait);
for (int i=0; i < strip.numPixels(); i=i+3) {
strip.setPixelColor(i+q, 0);
}
}
}
}
uint32_t Color(byte r, byte g, byte b)
{
uint32_t c;
c = r;
c <<= 8;
c |= g;
c <<= 8;
c |= b;
return c;
}
//255가지의 색을 나타내는 함수
uint32_t Wheel(byte WheelPos)
{
if (WheelPos < 85) {
return Color(WheelPos * 3, 255 - WheelPos * 3, 0);
} else if (WheelPos < 170) {
WheelPos -= 85;
return Color(255 - WheelPos * 3, 0, WheelPos * 3);
} else {
WheelPos -= 170;
return Color(0, WheelPos * 3, 255 - WheelPos * 3);
}
}
동영상
각 나라의 날씨에 따라 led가 다르게 제어되는 것을 확인 할 수 있습니다.


Klant
 orangeboard,cloud led, wifi shield, arduino, diy, open source hardware,
