
내 몸의 심박으로 패턴 이미지 만들기
2015-04-30 11:56:01
요즘은 심박 박동을 측정해 건강을 분석해 주는 헬스 케어 기기와 심장박동 인식으로 결제를 할 수 있는 웨어러블 기기도 나오고 있습니다.

겔럭시 기어핏
심박을 측정하고, 심박 데이터를 수집해 건강을 관리해준다.
이미지 출처 : 삼성 투모로우(samsung tomorrow)

바이오님 니미(Bionym Nymi)
심박 인식으로 결제를 간편히 진행할 수 있다.
이미지 출처 : 바이존(bizion)
병원에 가면 다들 한번씩은 심장 박동 측정기를 본 적이 있을겁니다.
심장 박동에 따라 심박 그래프가 화면에 표현되는데요.
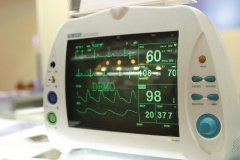
심장 박동 측정기
이미지 출처 : 영남일보
개요
병원에 들렸다가 심장 박동 측정기의 그래프를 멍때리며(?) 보다가
문득 "심장 박동이란 것도 개인만이 가지고 있는 Identity가 아닐까?"라는 생각을 해보았습니다.
우리들의 심장은 항상 뛰고 있으며, 그 주기는 사람마다 다르니까요.
또한 "심장 박동을 따분하고, 재미없는 선형 그래프로 표현하기보다는, 조금더 심미적으로 표현하면 재미있겠다"라는 생각이 들었습니다.
왜냐하면 세상에는 하나 뿐인 '나만의 패턴'이 되니까요!
이번 프로젝트에서는 심박 측정 센서와 프로세싱을 이용해 나만의 심박 패턴을 만들어 보겠습니다.
시작 전 개념 이해하기.
kocoafab에 있는 튜토리얼을 참고해 기본 사용법을 익혀두세요!
- 프로세싱과 아두이노 서보 모터와의 시리얼 통신 연동
부품 목록
| NO | 부품명 | 수량 | 상세 설명 |
| 1 | 아두이노 | 1 | 오렌지 보드 |
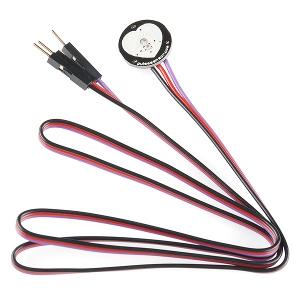
| 2 | 심박 센서 | 1 | Pulse sensor kit |
| 부품명 | 오렌지 보드 | 심박 센서 |
| 사진 | 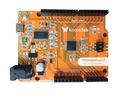 |
 |
하드 웨어 메이킹
브래드 보드 레이아웃

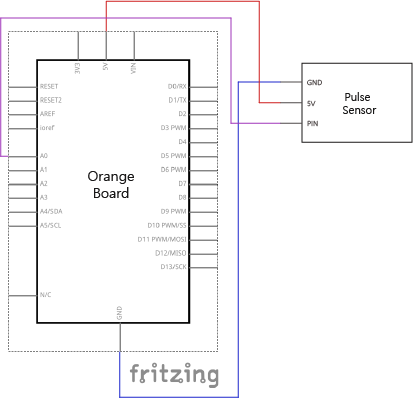
회로도
소프트웨어 코딩
아두이노
총 2개의 파일로 이루어져 있습니다.
2개의 파일은 같은 디렉토리 안에 위치시켜 주셔야 합니다.
- PulseSensorAmped_Arduino_1Dot1
- Interrupt
다음 링크로 이동해 파일을 다운로드 받으시면 됩니다.
PulsesensorAmped_Arduino_1dot1
// VARIABLES
int pulsePin = 0; // Pulse Sensor purple wire connected to analog pin 0
// these variables are volatile because they are used during the interrupt service routine!
volatile int BPM; // used to hold the pulse rate
volatile int Signal; // holds the incoming raw data
volatile int IBI = 600; // holds the time between beats, the Inter-Beat Interval
volatile boolean Pulse = false; // true when pulse wave is high, false when it's low
volatile boolean QS = false; // becomes true when Arduoino finds a beat.
void setup(){
Serial.begin(115200); // we agree to talk fast!
interruptSetup(); // sets up to read Pulse Sensor signal every 2mS
// UN-COMMENT THE NEXT LINE IF YOU ARE POWERING The Pulse Sensor AT LOW VOLTAGE,
// AND APPLY THAT VOLTAGE TO THE A-REF PIN
//analogReference(EXTERNAL);
}
void loop(){
sendDataToProcessing('S', Signal); // send Processing the raw Pulse Sensor data
delay(20);
}
void sendDataToProcessing(char symbol, int data ){
Serial.print(symbol); // symbol prefix tells Processing what type of data is coming
data = map(data,200,900,0,10);
data = constrain(data,0,10);
Serial.println(data); // the data to send culminating in a carriage return
}
Interrupt
volatile int rate[10]; // used to hold last ten IBI values
volatile unsigned long sampleCounter = 0; // used to determine pulse timing
volatile unsigned long lastBeatTime = 0; // used to find the inter beat interval
volatile int P =512; // used to find peak in pulse wave
volatile int T = 512; // used to find trough in pulse wave
volatile int thresh = 512; // used to find instant moment of heart beat
volatile int amp = 100; // used to hold amplitude of pulse waveform
volatile boolean firstBeat = true; // used to seed rate array so we startup with reasonable BPM
volatile boolean secondBeat = true; // used to seed rate array so we startup with reasonable BPM
void interruptSetup(){
// Initializes Timer2 to throw an interrupt every 2mS.
TCCR2A = 0x02; // DISABLE PWM ON DIGITAL PINS 3 AND 11, AND GO INTO CTC MODE
TCCR2B = 0x06; // DON'T FORCE COMPARE, 256 PRESCALER
OCR2A = 0X7C; // SET THE TOP OF THE COUNT TO 124 FOR 500Hz SAMPLE RATE
TIMSK2 = 0x02; // ENABLE INTERRUPT ON MATCH BETWEEN TIMER2 AND OCR2A
sei(); // MAKE SURE GLOBAL INTERRUPTS ARE ENABLED
}
// THIS IS THE TIMER 2 INTERRUPT SERVICE ROUTINE.
// Timer 2 makes sure that we take a reading every 2 miliseconds
ISR(TIMER2_COMPA_vect){ // triggered when Timer2 counts to 124
cli(); // disable interrupts while we do this
Signal = analogRead(pulsePin); // read the Pulse Sensor
sampleCounter += 2; // keep track of the time in mS with this variable
int N = sampleCounter - lastBeatTime; // monitor the time since the last beat to avoid noise
// find the peak and trough of the pulse wave
if(Signal < thresh && N > (IBI/5)*3){ // avoid dichrotic noise by waiting 3/5 of last IBI
if (Signal < T){ // T is the trough
T = Signal; // keep track of lowest point in pulse wave
}
}
if(Signal > thresh && Signal > P){ // thresh condition helps avoid noise
P = Signal; // P is the peak
} // keep track of highest point in pulse wave
// NOW IT'S TIME TO LOOK FOR THE HEART BEAT
// signal surges up in value every time there is a pulse
if (N > 250){ // avoid high frequency noise
if ( (Signal > thresh) && (Pulse == false) && (N > (IBI/5)*3) ){
Pulse = true; // set the Pulse flag when we think there is a pulse // turn on pin 13 LED
IBI = sampleCounter - lastBeatTime; // measure time between beats in mS
lastBeatTime = sampleCounter; // keep track of time for next pulse
if(firstBeat){ // if it's the first time we found a beat, if firstBeat == TRUE
firstBeat = false; // clear firstBeat flag
return; // IBI value is unreliable so discard it
}
if(secondBeat){ // if this is the second beat, if secondBeat == TRUE
secondBeat = false; // clear secondBeat flag
for(int i=0; i<=9; i++){ // seed the running total to get a realisitic BPM at startup
rate[i] = IBI;
}
}
// keep a running total of the last 10 IBI values
word runningTotal = 0; // clear the runningTotal variable
for(int i=0; i<=8; i++){ // shift data in the rate array
rate[i] = rate[i+1]; // and drop the oldest IBI value
runningTotal += rate[i]; // add up the 9 oldest IBI values
}
rate[9] = IBI; // add the latest IBI to the rate array
runningTotal += rate[9]; // add the latest IBI to runningTotal
runningTotal /= 10; // average the last 10 IBI values
BPM = 60000/runningTotal; // how many beats can fit into a minute? that's BPM!
QS = true; // set Quantified Self flag
// QS FLAG IS NOT CLEARED INSIDE THIS ISR
}
}
if (Signal < thresh && Pulse == true){ // when the values are going down, the beat is over // turn off pin 13 LED
Pulse = false; // reset the Pulse flag so we can do it again
amp = P - T; // get amplitude of the pulse wave
thresh = amp/2 + T; // set thresh at 50% of the amplitude
P = thresh; // reset these for next time
T = thresh;
}
if (N > 2500){ // if 2.5 seconds go by without a beat
thresh = 512; // set thresh default
P = 512; // set P default
T = 512; // set T default
lastBeatTime = sampleCounter; // bring the lastBeatTime up to date
firstBeat = true; // set these to avoid noise
secondBeat = true; // when we get the heartbeat back
}
sei(); // enable interrupts when youre done!
}// end isr
pulse sensor에서 받아온 값을 0부터 10까지의 값으로 선형변환(map)시켜줍니다.
다음 동영상과 같이 심장이 뛰는 것을 인식 했을 때 10을 출력합니다.
프로세싱
총 2개의 파일로 이루어져 있습니다.
2개의 파일은 같은 디렉토리 안에 위치시켜 주셔야 합니다.
- project_color_soul_rect_Run
- serialEvent
다음 링크로 이동해 파일을 다운로드 하시면 됩니다.
project_color_soul_rect_Run
import processing.serial.*;
Serial port;
Curveline[]curvelines = new Curveline[1]; // 심박 패턴을 그릴 객체 선언, 코드 하단부에 Curveline class가 심박 패턴을 그리는 부분이다.
int Sensor; // 아두이노에서 심박 센서값을 받아와 담을 변수
void setup(){
size(600,600);
smooth();
background(255);
// GO FIND THE ARDUINO
println(Serial.list()); // 사용 가능한 시리얼 포트 출력
port = new Serial(this, Serial.list()[0], 115200); // 시리얼 통신 초기화, 만약 아두이노의 포트가 2번째로 연결되어 있다면 Serial.list()[0]을 Serial.list()[1]로 바꿔준다
port.clear();
port.bufferUntil('\n');
for(int i=0; i curvelines[i]= new Curveline(); //심박 패턴을 그릴 객체 초기화
}
}
void draw(){
noStroke();
for(int i=0; i curvelines[i].rotation();
curvelines[i].deco();
curvelines[i].display(Sensor); // 심박 센서 값을 인자로 받아 원의 크기에 센서 값을 반영.
}
println(Sensor);
}
void mousePressed(){ //마우스 클릭 시
saveFrame("pat-####.png"); // 이미지 파일로 저장
}
class Curveline{
float endx;
float endy;
float theta = 0;
float r = 0;
float op;
float sw;
float time =60;
float increment = 0.2;
Curveline(){
}
void rotation(){
endx = cos(theta) * r;
endy = sin(theta) * r;
theta+=0.01;
r+=0.02;
}
void deco(){
sw = noise(time)*0.4;
op = noise(time)*70;
increment+=0.2;
time+=increment;
}
void display(int pScale){
fill(0,op);
ellipse(width/2+endx,height/2+endy,pScale,pScale);
ellipse(width/2-endx,height/2-endy,pScale,pScale);
}
}
serialEvent
void serialEvent(Serial port){
String inData = port.readStringUntil('\n');
inData = trim(inData); // cut off white space (carriage return)
if (inData.charAt(0) == 'S'){ // leading 'S' for sensor data
inData = inData.substring(1); // cut off the leading 'S'
Sensor = int(inData); // convert the string to usable int
}
}
아두이노에서 보내는 심장 박동 데이터를 받아와 사용합니다.
아두이노와 마찬가지로 심장 박동을 인식 했을 때 10을 출력합니다.
결과물


저의 심박수로 만들어진 심박수 패턴입니다. 주기적으로 심장이 뛰면서 정돈된 패턴이 완성되었죠?
실제로 동료에게 해보았더니 저랑은 다른 심박 패턴이 나오는 것을 확인할 수 있었습니다.
동영상
심박이 감지 될 때마다 원의 크기가 증가합니다.
원의 크기 변화가 캔버스에 남기 때문에 시간이 지나면서 심박 주기에 맞는 패턴이 형성 되는 것을 확인 할 수 있습니다.


Klant
 kocoafab,Kocoafab,processing,arduino,orangeboard,pattern,pulsesensor,heartbeat,bpm,pulse
